| General | Console | Combinations | Recordings | Demo | Gallery | Settings | Return to Main Page |
This is the documentation of Napo 4.4. The user manual of Napo 3 is still available here. The user manual of the current version is here.
General Remarks
Napo's user interface is built from a set of specialised main views, some of which have associated helper views. You select a main view by tapping an element of the icon bar that is displayed at the bottom of the screen:

These are the icons (GLYPHICONS, by the way) and their respective purpose:

|
This is to display the Console view, which shows the stop, tremulant and coupler knobs and some other frequently used buttons. This view can also display onscreen keyboards. |

|
This is to display the Combinations view, which allows you to edit combination banks and combinations. A combination is a kind of bookmark, so we chose a bookmark icon. |

|
This is to display the Recordings view, where you can listen to and administrate your audio recordings or other audio files uploaded to the app. |

|
This icon is to display the Demo view, which lets you play some demo pieces that are included in the app. |

|
This is to display the Gallery view, where you can enjoy images of the organ, the church or concert hall or its surrounding. |

|
This is to display the Settings view, where various kinds of app settings can be edited. |

|
This icon does not stand for a view, but it provides fast organ switching functionality. It is a plane that takes you to other organs, so to speak. |
Each of the mentioned views is described in its own section of this user manual. Concerning fast organ switching, after tapping the airplane icon, the other installed Napo apps are displayed, and you can immediately "fly" to another organ by tapping its image:
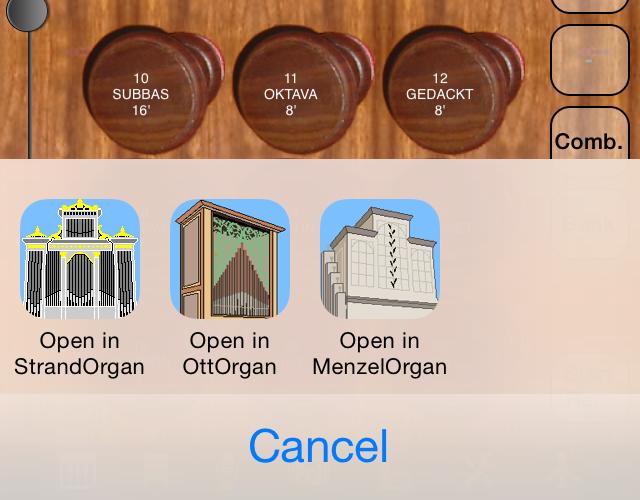
Don't be irritated by the text "Open in ...". This is created by iOS and, unfortunately, cannot be changed.
There are some more elements that are common to all of the above mentioned views. Which of these are actually displayed, depends on settings made in the Settings view.
- The Level bar and the Load bar: There is a thin vertical audio level
bar at the left border of the screen. In case the audio level grows to
a value where the sound would overdrive, Napo will reduce the volume
accordingly to prevent this. You can see the volume slider of
the Console view move downwards when this happens.
Next, at the bottom of the screen, above the tab bar, there is a thin horizontal load bar. Its length is a measure for the time which the app needs to generate the audio data. When the load bar approaches the right border of the screen, the app does not manage to generate audio data fast enough. This state is signalled as a CPU Overload condition (see below).
Furthermore, at the bottom right you see the number of playing voices. In Napo 4.0, this does also include the blower noise (1 voice), the keys noise (1 voice per pressed key) and the knobs noise (1 voice per active knob). Starting with Napo 4.1, only the pipe voices are counted. - CPU Overload, I/O Overload and Reverb Overload display: A CPU overload means that the app could not complete the generation of a packet of sound within the available time frame, while an I/O overload means that data could not be loaded from the SSD fast enough. A Reverb Overload can occur if you use convolution reverb with impulse responses that are too long to be processed by your device. These overload conditions lead to degraded sound quality or even to interruptions of the sound.

