| Return | General | Console | Combinations | Recordings | Demo | Gallery | Settings |


|
Console
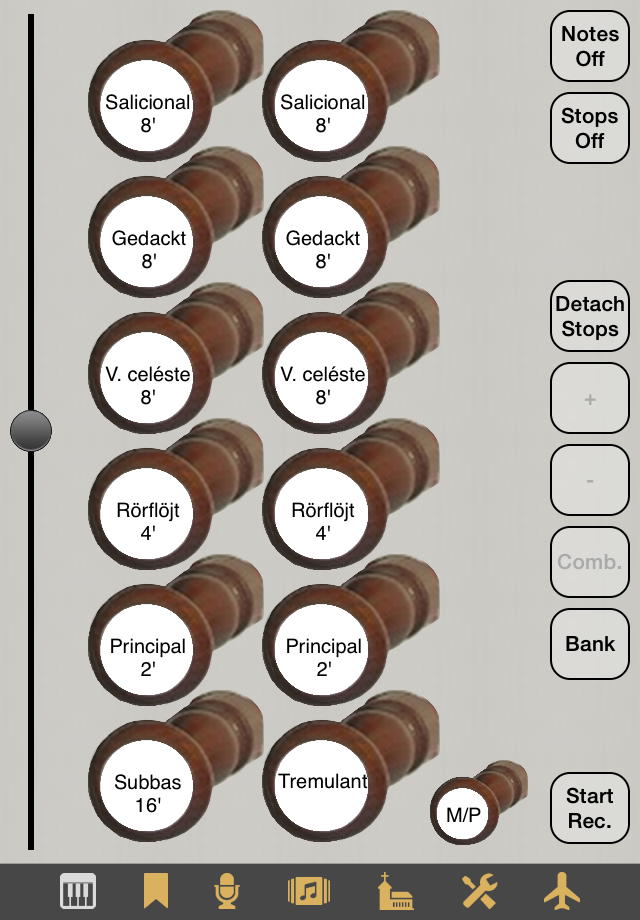
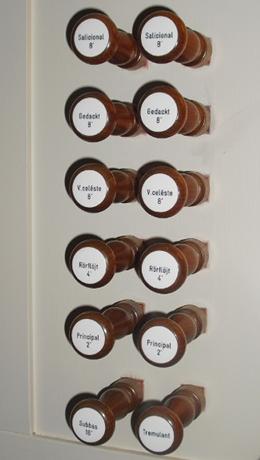
The Console view is the view that you get when you start a Napo app and which you use most of the time while playing the organ. Besides the organ-specific knobs (stops and maybe couplers and tremulants) in the mid, it offers a general volume control at the left and several buttons at the right. Whenever possible, the Console view is designed to match the look of the stops board of the real organ console. As an example, look at the Console view of MenzelOrgan. This organ has five manual ranks, each divided in a bass and a diskant stop, a pedal rank and a tremulant. Compare the Console view of the app (left) to Lars Palo's photo of the real stops board (right):
 |
 |
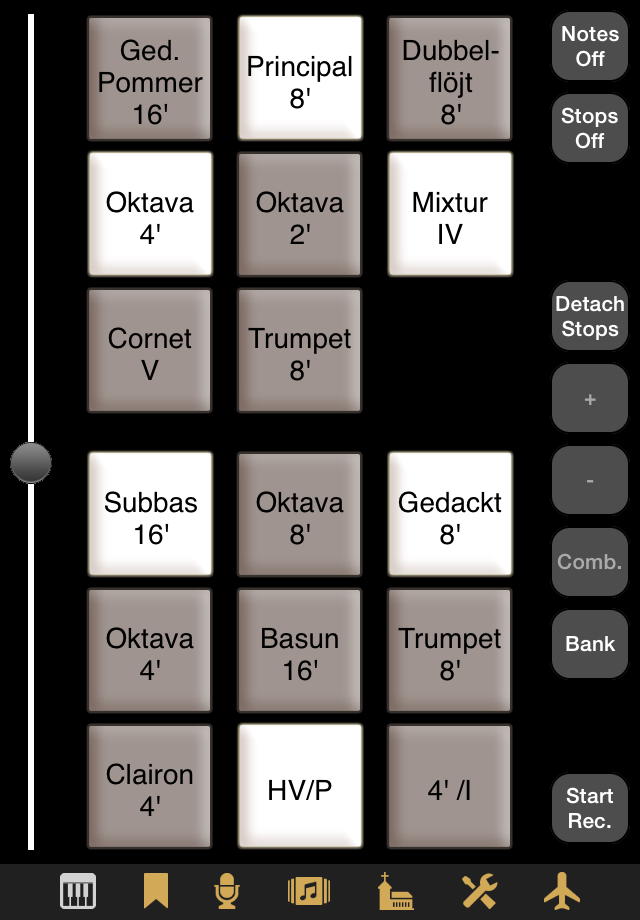
At the beginning you might find the visual discrimination between active and inactive stops to be difficult, but, like with a real instrument, this is a matter of practice. Furthermore, being the organist, you know and you hear which stops you have pulled, don't you? Anyway, you can select the console style Abstract in the Settings view, which make it easier to identify active and inactive stops. For example for PiteaMini it looks like this:
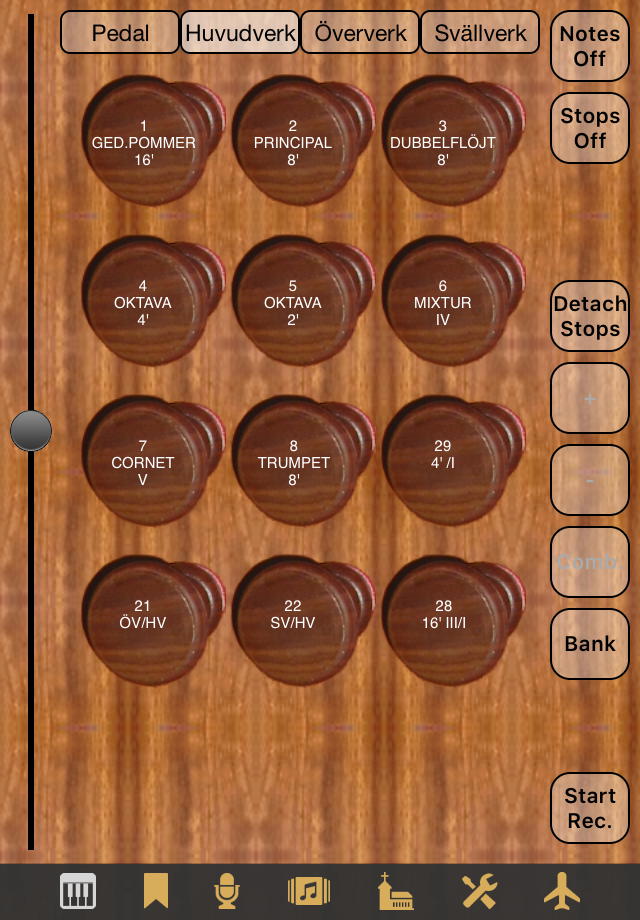
For large organs with many stops, the screen area of small devices is insufficient to show all stop buttons. To allow operating these instruments on iPhones also, starting with version 4.15, Napo facilitates the display of stops ordered by divisions, as demonstrated here with Pitea app:
Before explaining the buttons at the right, let's talk about Napo's combination mechanism.
A combination is a set of knob settings (stops, couplers, tremulants) of the organ. It allows for fast registration changes while playing. In Napo, combinations are organised in combination banks. The intention is that you create a combination bank for a piece of organ music and in this bank create combinations for the parts of this piece, in the ordering in which you need them. Then, while playing the piece, you can use the + button to step through the combinations. This stepper functionality can also be controlled via MIDI.
The number of combination banks and the number of combinations in a bank are not restricted. A bank can be created by long-tapping the Bank button. When there are banks, you can select a bank after short-tapping this button. When a bank is selected, you can create a combination for this bank from the current stops setting of the Console view by long-tapping the Comb. button, or select a combination from this bank after short-tapping this button. For editing functionality, use the Combinations view.
Now the description of the Console view's buttons:
- Notes Off: This button switches all playing notes off and might be useful if you have an unreliable MIDI connection and suffer from stuck notes.
- Stops Off: This button switches all stops and as well all couplers and all tremulants off.
- Demo Off: This button is visible while a demo song is playing. Tap to stop the demo.
- Detach Stops: After tapping this button, you can operate the stop, coupler and tremulant knobs, but the changes won't take effect until you tap the button (which is then labelled Attach Stops) once again. This allows registration changes during playing, for later use.
- +: This button is visible after you have selected a non-empty combination bank. Tap to switch to the next combination of the bank.
- -: This button is visible after you have selected a non-empty combination bank. Tap to switch to the previous combination of the bank.
- Comb., Bank: The usage of these buttons has been explained above.
- Blower: You see this button only if the app includes an audio file with blower noise. Tap the button to turn the blower noise on and off.
- Start Rec.: Tap this button to use the internal
audio recorder. You will be asked whether the recording should start
immediately or be triggered by the first sound. A recording
in progress is indicated by a red colored
Console view icon, and the Start Rec.
button's label changes to Stop Rec.. Tap the button
again to finish the recording. You will be asked if you would like to
save or to delete the recording. For saving, you can accept the default
file name built with the current date and time, or enter a different
name. The recording will be put in a WAV file in the app's documents
directory. Change to the Recordings view to listen to
the recording.
In Napo 4.11 and later, the behaviour of the recording function can be configured after long-tapping this button. You can select the bit resolution of the recording (16 or 24 bit) and whether the recording should start immediately when the button is tapped or only when the sound starts. Furthermore you can select whether the app will ask for the name of the WAV file or creates a standard name from the current date and time. In the latter case there is no user interaction needed when finishing a recording, which is in particular nice when the recording is controlled by a MIDI button.
The fact that there is a dedicated volume control which does not affect the system volume deserves an explanation. There are several reasons for the existence of this control:
- An obvious use case for an organ app is to let the iOS Music application or another app render a piece from your music library and to accompany this by yourself playing the organ. Then you need to adapt the volume of the organ to the system volume / Music application volume.
- A pipe organ has an incredibly large dynamic range. The volume slider is calibrated such that 'normal' organ pieces can be played at medium volume setting without distortion of the sound. However, when you play some esoteric stuff with clusters of notes and many stops, then the sound will overdrive. In this case the volume is reduced automatically – you will see the volume control sliding down by a certain amount. When you play the piece the next time, you yourself can adjust the volume slider at the beginning and compensate this by increasing the system volume or the volume of your external amplifer.
- The system volume control does not operate on the line output e.g. of an iPad dock. Using the app's volume control you can still adjust the volume to your needs.
- When you use the app's internal audio recorder, you turn up the volume of the app to a value that gives the recording a high recording level. Now if your headphones are very sensitive, this level may be uncomfortably loud. Using the device's volume buttons you can lower the headphone volume without reducing the recording level.
- When using an USB audio interface with a digital audio output, the system volume control might not work. This is a drawback if you use active speakers with digital inputs and no volume control. The app's volume slider helps in this case, too.
The volume can also be controlled via MIDI. You need to configure this functionality in the Settings-MIDI view. You will see the Console view's volume slider move when you operate the external volume slider or swell pedal that you have linked to the general volume.
Other functions (stops, couplers, tremulants, combination selection) can be controlled via MIDI, too. Once again, use the Settings view to configure this.
For playing very simple pieces or for composing music on the road, Napo offers onscreen keyboards. When you are in the Console view, you can toggle between the stops display and a combined stops / keyboard display by tapping the Console view icon. By long-pressing the icon you get a fullscreen keyboard display.
Onscreen keyboards make most sense on an iPad in landscape mode. As an example, this is the stops / keyboards mode of PiteaMini:
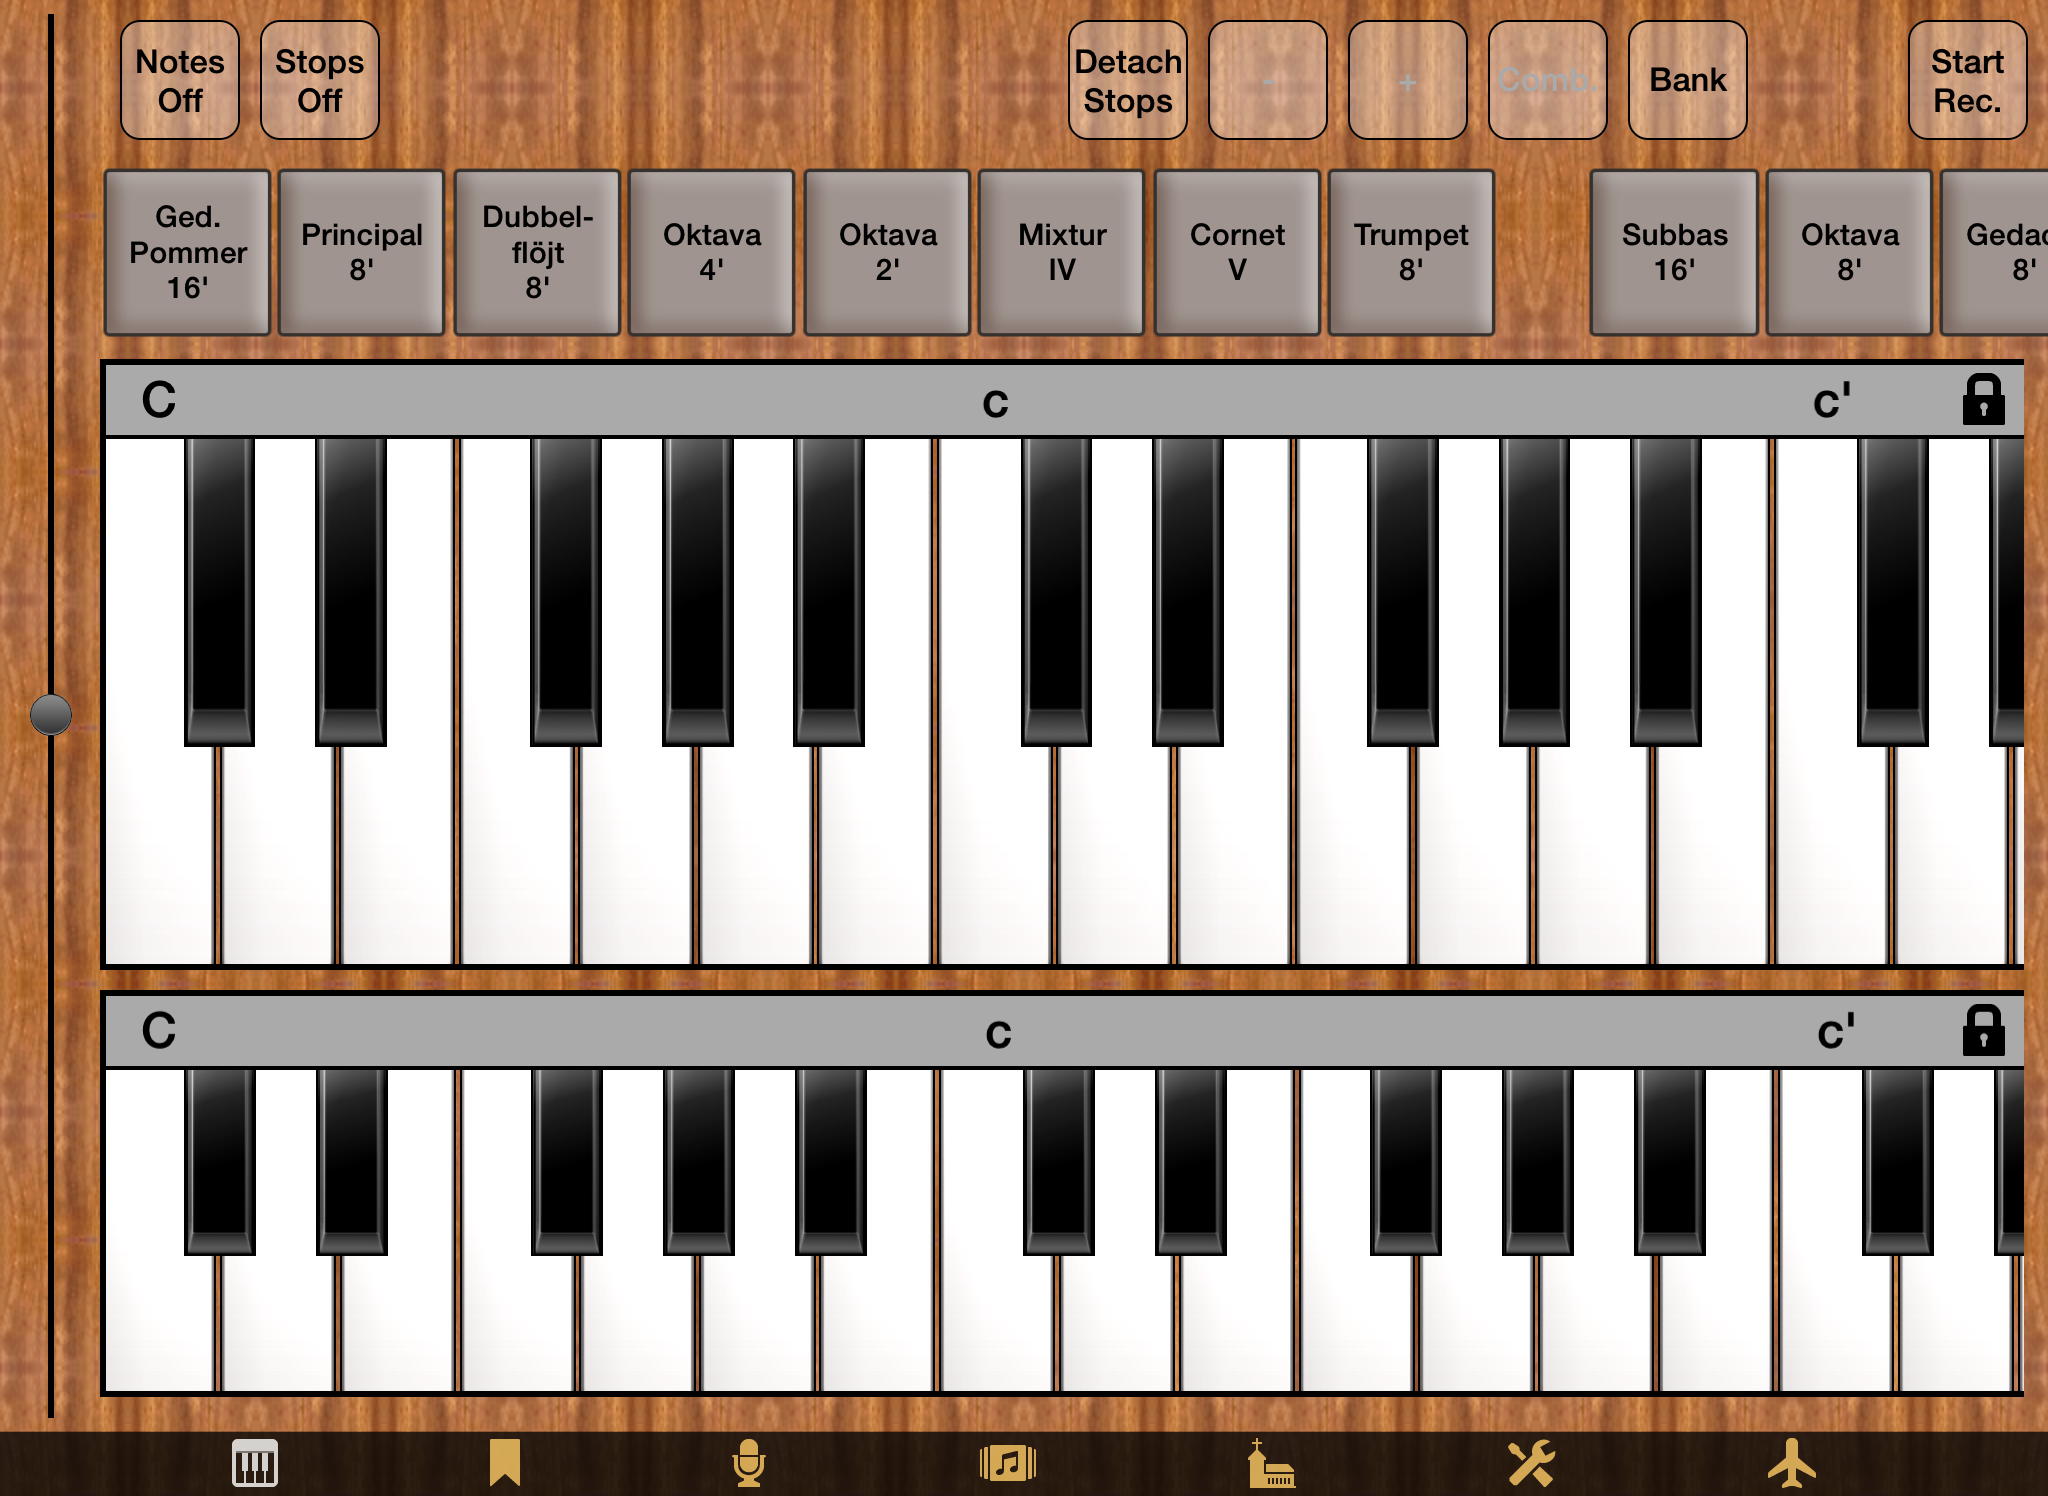
Here, the upper keyboard is the manual, the lower keyboard plays the pedal stops. Both can be scrolled horizontally by dragging the grey strip. The stops can be scrolled, too. The empty space between Trumpet 8' and Subbas 16' is well suited to grab it for scrolling, but you can also drag the stop buttons if you have deactivated Multitasking Gestures in your device settings. This is recommended anyway if you use the virtual keyboards, because otherwise there is the risk to switch apps when you play a chord and move your fingers.
At the right end of the grey strips you can see lock symbols. When you tap a lock, the currently pressed keys of the corresponding keyboard get fixed. A fixed key is released only when you tap it again (or tap the Notes Off button).
It has turned out that some users prefer easy access to a small collection of combinations over the bank / combination system. Napo offers an alternative combination handling in the form of buttons A,B,C,D,E:

These buttons are displayed if you choose ABCDE in the Settings view at Appearance / Combination Mode. You can save a combination by long-tapping one of the buttons and selecting Save in the menu. You can load a combination by short-tapping.
The A,B,C,D,E combinations are completely independent of the bank / combination system, but as Napo 4.5 adds support for storing combination banks in iCloud, there was a way needed to also share the A,B,C,D,E combinations with other devices. This can be achieved by creating a combination bank from the A,B,C,D,E combinations, sharing this bank via iCloud, and on another device importing the bank to A,B,C,D,E. The needed functionality is available by two additional entries of the menu that you get by long-pressing an A,B,C,D,E button:
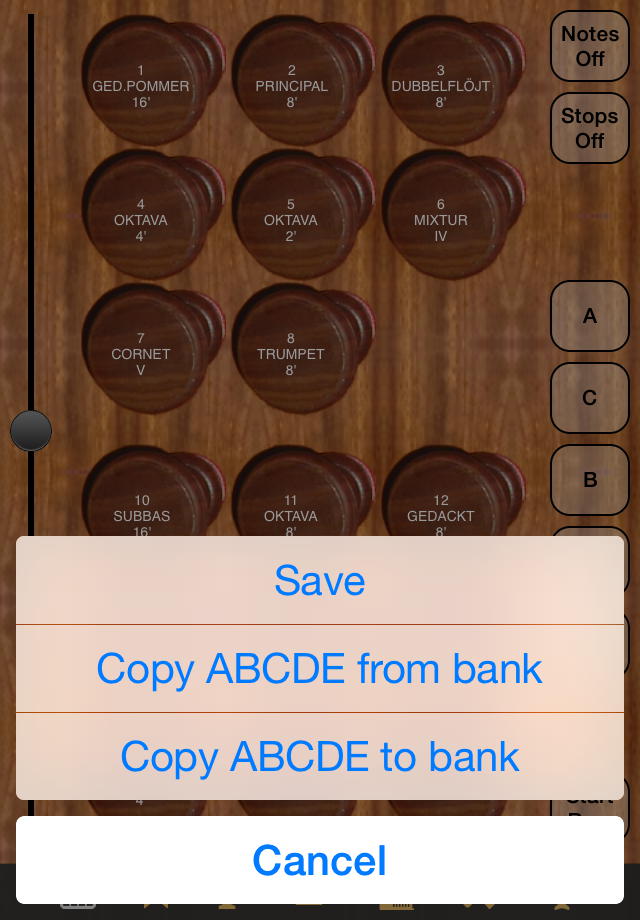
It does not matter which of the buttons A,B,C,D,E you choose – all five combinations are copied from / to a bank. When copying to a bank, you have to enter a bank name. When copying from a bank, you can select a bank from a list.
Starting with Napo 4.16, these five combination buttons can be labelled with FF,F,M,P,PP instead of A,B,C,D,E by making the according selection the Settings view at Appearance / Combination Mode. The mapping A ⟷ FF etc. is this way to put FF at the top and PP at the bottom in portrait mode. Consequently, FF is at the left in landscape mode. This is counterintuitive, and hence it was changed in Napo 4.17. Furthermore, the button M is relabelled to MF in version 4.17.
Note however that it is up to the user to create stop combinations for the buttons FF etc., as usual by long-tapping. There are no predefined configurations for these buttons.