| Return to the Thafknar Support Page | Return to the Thafknar User Manual |
MIDI control
When you have purchased MIDI control, you can operate the following functions of the app by MIDI messages:
- Audio recorder functions. You can use note-on or program change messages for this.
- Preset selection, as well via note-on or program change messages.
- Parameters of the iOS reverb. Here you can use MIDI controllers, which usually are sliders or rotary knobs.
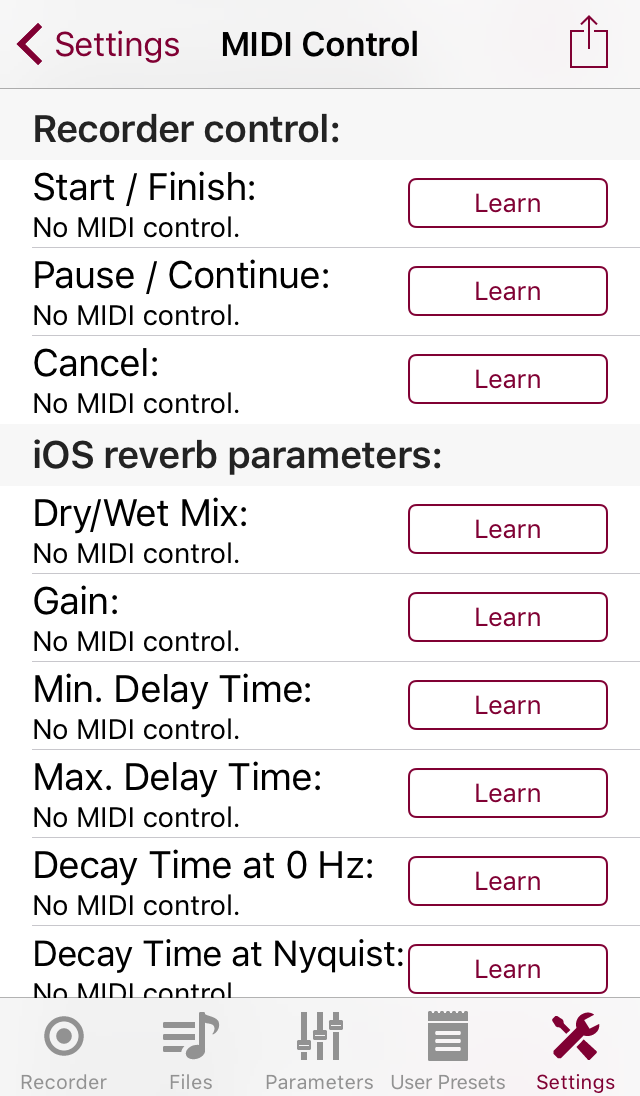
Defining MIDI controls for preset selection is done in the User Preset view, as mentioned above. The audio recorder functions and iOS reverb parameters, on the other side, are handled by the MIDI Control view, which you get by tapping the Configure button in the Settings view. The MIDI Control view also serves for selecting the supported MIDI paths:

There are four ways to receive MIDI messages:
-
Wired: This includes the following connection types:
- Via an Apple 30-pin or Lightning to USB adapter (also known as "CCK" for "Camera Connection Kit") connected to a MIDI keyboard or other MIDI device with USB interface.
- Via a CCK to an USB – MIDI 5pin adapter to a MIDI device with a classical 5pin MIDI interface.
- Via an interface like the iRig MIDI or MIDI Mobilizer II (for iOS devices with the old 30-pin dock connector).
- Network: For MIDI over network, which in our case means WLAN. This is also known as RTP-MIDI. You need to configure a MIDI network session, which can be done with the Audio MIDI Setup on macOS. We think that network MIDI is complicated and unreliable and cannot really recommend to use it.
- Virtual: For receiving MIDI messages from other apps running on the same device, via a so-called Virtual MIDI port. This makes sense only in combination with the MIDI control mode + Background op., see Settings view. Virtual MIDI is simple and reliable. When you activate the Virtual option, the app advertises itself via Virtual MIDI with the port name "Thafknar". Well-designed sender apps allow the user to select the destination port. For apps that give the user no way to select destinations, starting with version 5.0 Thafknar has the switch Virtual autoconnect. If you activate this switch, then Thafknar will automatically connect to all Virtual MIDI senders.
- Bluetooth: For receiving MIDI over Bluetooth. Only recent enough iOS devices support this. After enabling Bluetooth MIDI, you need to tap Connect. You will then be asked if you would like to scan for other devices or advertise this device. With the latter option, the connection must be initiated by the sending device. The first option is new in Thafknar 5.0 and has the purpose to establish connections to devices that cannot do this on their own (like simple MIDI to Bluetooth adapters, for example).
Below the Supported MIDI paths section there is a section Recorder control and a section iOS reverb parameters. After tapping a Learn button for a recorder control you can operate a key of a MIDI keyboard or another switch that sends MIDI note or program change messages to connect this switch to the respective recorder function. In case of a reverb parameter, you have to operate a MIDI controller. The detail text of each entry shows the current state. Entries for which a MIDI control was defined have a cross button besides the Learn button. This is for deleting the respective control definition.