
|
Rooms!App Version: 4.10released 2016-04-18
|
|
If you are viewing this support page on your device and have Rooms! installed, then you can download and install the following prepared impulse response sets simply by tapping the links. Depending on your network connection, this may take some time. Mind the file sizes if you are on a cellular network.
| van Saane | http:/polaron.de/Rooms/van Saane.irset | 8.2 MB |
| Voxengo 1 | http:/polaron.de/Rooms/Voxengo 1.irset | 1.8 MB |
| Voxengo 2 | http:/polaron.de/Rooms/Voxengo 2.irset | 1.9 MB |
| Voxengo 3 | http:/polaron.de/Rooms/Voxengo 3.irset | 1.6 MB |
| Voxengo 4 | http:/polaron.de/Rooms/Voxengo 4.irset | 1.8 MB |
Update 2016-03-10: The above irset files have been replaced by versions that do not contain MacOS metadata files. Furthermore, the zip structure is now flat i.e. does not include the directory, as this is created by the unzipper. The old versions expanded to an additional directory hierarchy level. As a consequence, the comment and license files were not visibile by Rooms!.
What is Rooms! ? ↑
Rooms! is a free iOS application for adding reverb to audio files and to audio streams (Audiobus 2 and Inter-App Audio). Audio files can be uploaded to the app via iTunes File Sharing or by Document Interaction. Uploaded files, and files created by the app, can be shared by iTunes File Sharing, by Document Interaction or by e-mail. Two types of reverb are supported: Algorithmic reverb created by an iOS Audio Unit, where you can control all parameters of the reverb effect unit, and convolution reverb. Rooms! has a built-in audio recorder which allows you to save M4A/AAC or WAV files with various sample rates and bit depths and later add reverb to these files. Using playthrough, you can in realtime add reverb to the sound captured by the microphone or from an external sound source.
Possible applications:
- Record your own voice, add reverb, and e-mail the result to your friends ("Listen, I am in Paris right now, visiting Notre-Dame ..."). Of course you can use Rooms! as a plain but comfortable voice recorder and voice mail system, without applying effects to the recorded files.
- Record the sounds in your apartment or the street, the sounds of your pets and household appliances, and experiment with how they would sound in a hall or cathedral.
- Use the playthrough functionality and earphones to listen to your reverberated world.
- If you are a musician, add reverb to tracks of your music productions.
- If you are a guitarist, use the convolution reverb for cabinet simulations (provided you have suitable impulse response files).
- And of course all the use cases that a filter app in the Audiobus ecosystem or an IAA effect offers.
- Last not least you can use Rooms! simply as an easy-to-operate, reliable and versatile audio recorder.
For a perfect experience, earphones / headphones or external speakers are recommended. For the playthrough functionality with microphone input, earphones / headphones are mandatory, otherwise a feedback loop is formed.
Rooms! is free, but the convolution reverb of the free version is restricted to the integrated demo impulse responses. You can use other impulse responses (stereo sound files up to a length of 15 seconds) only after in-app purchasing the item "Convolution Reverb".
System requirements ↑
Rooms! runs on all iOS devices (iPhone, iPod touch, iPad) with iOS versions ≥ 5.1.1. Audiobus, IAA and iCloud support are available on iOS versions ≥ 7. Slide Over and side-by-side view support is available on iOS versions ≥ 9 and iPad Air 2 or better.
For using convolution reverb in realtime, at least an iPad 4 or iPhone 5 is recommended. Impulse responses that are too long will lead to reduced sound quality or even to stuttering or missing sound. You can try the suitability of your device with help of the free demo mode and the included demo impulse responses.
Localizations ↑
Rooms! supports the following languages:
- English
- German
Using the app ↑
Rooms! is built of five main views, each of which can be selected by the tab bar at the bottom of the screen. The icons, by the way, are elements of Jan Kovařík's GLYPHICONS library:

- Use the Recorder view to create audio recordings with your device's internal or a suitable external microphone or another external sound source. The files are saved to the app's documents folder.
- The Files view shows a list of files in the documents folder: audio files, impulse response archives uploaded by iTunes File Sharing, by Document Interaction or by direct HTTP download, and cancelled recordings. You can play audio files with or without added reverb. Action menus offer additional functionality. Starting with Rooms! 4.6, you can move files to/from iCloud if you enable iCloud usage for Rooms!.
- The Parameters view lets you select the reverb type (iOS Audio Unit reverb or Convolution Reverb) and change the parameters of the reverb. This can be done while audio is playing, so the resulting effect can be heard immediately. When you are happy with the outcome, you can create an audio file with reverb, which you can transfer to other apps for further processing. You can also save the reverb parameters in a user preset. For iOS reverb, there are buttons for loading a preset from a list of factory presets or user presets. Furthermore, there is a button to activate playthrough.
- The User Presets view shows a list of the saved presets. You can rename or delete user presets. When you select a user preset, its parameters are immediately taking effect.
- In the Settings view you can configure various parameters. Furthermore, it has an action menu with options to view version information, to show the available in-app purchases, to show the app's description in the App Store and to display the app's support page (the page that you are viewing right now) in Safari.
The views and their usage shall now be explained in more detail.
The Recorder view ↑
This view is displayed after a cold-start of the app. It has a single button, named Start, which serves for starting a recording, and buttons to select the file format, the sample rate, the bit depth and the channel mode for the recording:

The recorder supports the creating of compressed AAC (Advanced Audio Coding) and uncompressed WAV files.
The supported sample rates are 8, 16, 22.05, 44.1, 48 and 96 kHz. However, this does not mean that the audio will be captured in the requested quality, in particular if you are using the device's internal microphone. Furthermore, the capture sample rate will probably be not higher than the current hardware sample rate of the device, which you can see at the bottom of the Settings view. If you select 48 kHz or 96 kHz, but the hardware sample rate is 44.1 kHz, then the audio data of the file will just be upsampled from 44.1 kHz or whatever the microphone or sound source deliver. Whenever the recording sample rate and the current hardware sample rate differ, the app displays a warning at the top of the Recorder view, because this means an additional resampling process that can reduce the quality of the sound data.
The bit depths are 8, 16 and 24 bit for integer and 32 bit for floating point uncompressed WAV files. For AAC, this setting has no meaning.
The channel mode is Mono or Stereo. Again, selecting Stereo does not give a true stereo file if your microphone or sound source delivers a mono signal. You will just get a file with two identical channels. Only if you connect a stereo microphone or stereo sound source, you will get a real stereo file.
AAC offers good sound quality and requires significantly less SSD space than uncompressed WAV. The setting 44100 Hz / 16 bit gives a frequency range and dynamics that comfortably exceed what your ears can perceive and hence is fine for recording music. A lower sample rate means that you loose high frequencies. With a lower bit resolution you can still record the same frequency range, but it gives a lower signal / noise ratio. For voice messages, 8000 Hz / 8 bit / Mono are good enough and result in smaller files. Use WAV format and 44100 or 48000 Hz and 24 or 32 bit for recording sound that you intend to postprocess or use as an impulse response (see later).
You have to set the parameters before you start the recording. As soon as you tap the Start button, the recording begins and the view displays the buttons Pause, Cancel and Finish. While the recording is performed, you can observe the number of elapsed seconds, which is also displayed below the icon of the Recorder view. By tapping the dashboard icon, you can activate a peak meter, which is displayed at the left side of the view:

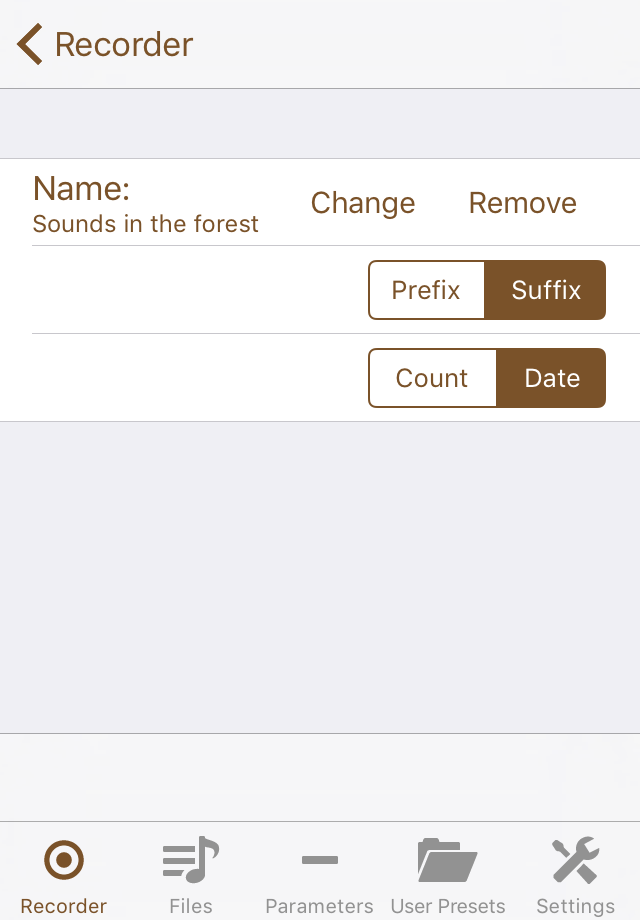
The usage of the buttons Pause, Cancel and Finish is obvious. Only after you press the Finish button, the recording will be saved to the documents directory and can be seen in the Files view. For the recording's name, you can enter a base name and let it be prefixed or suffixed either with the date or with a counter. The file name pattern is displayed at the lower left of the Recorder view and can be changed after tapping at the text. Of course you can later change the name in the Files view, see below.
The behaviour when a recording is finished can be configured in the Settings view. You can advise the app to either stay at the Recorder view or automatically switch to the Files view and select the recording file.
If you cancel a recording, it is not lost. You can see it in the section Cancelled Recordings of the Files view. You can later decide if you would like to restore or really would like to delete it.
Furthermore, a recording in progress is not neccessarily lost in case of a system crash. At the next start of Rooms!, the app will see the temporary file and ask if you would like to recover it. Note however that this file will be incomplete and structurally broken. You need an external audio files tool to repair it.
To ensure you don't loose any data in case of an incoming phone call, in this situation the recording is being finished and saved.
The Files view ↑
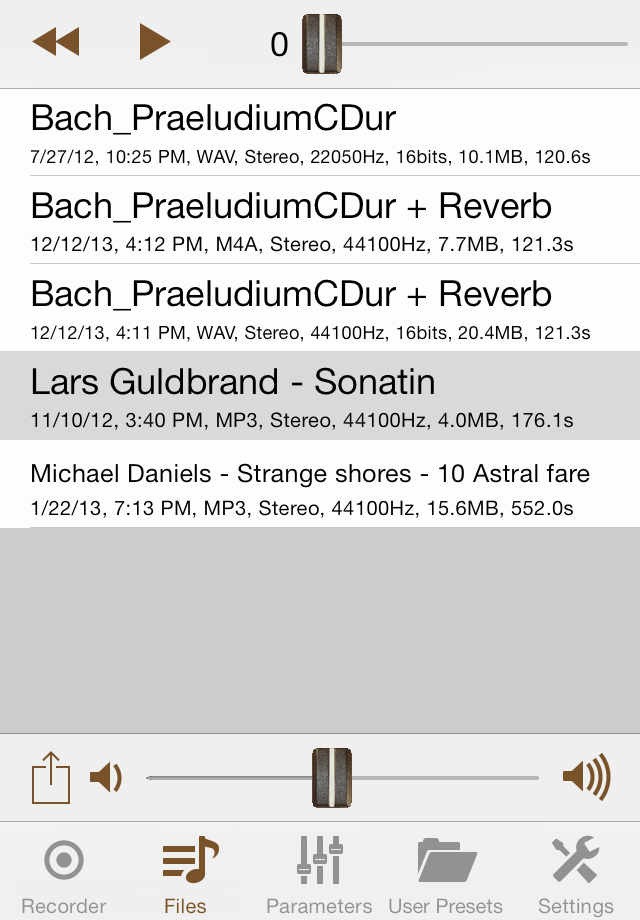
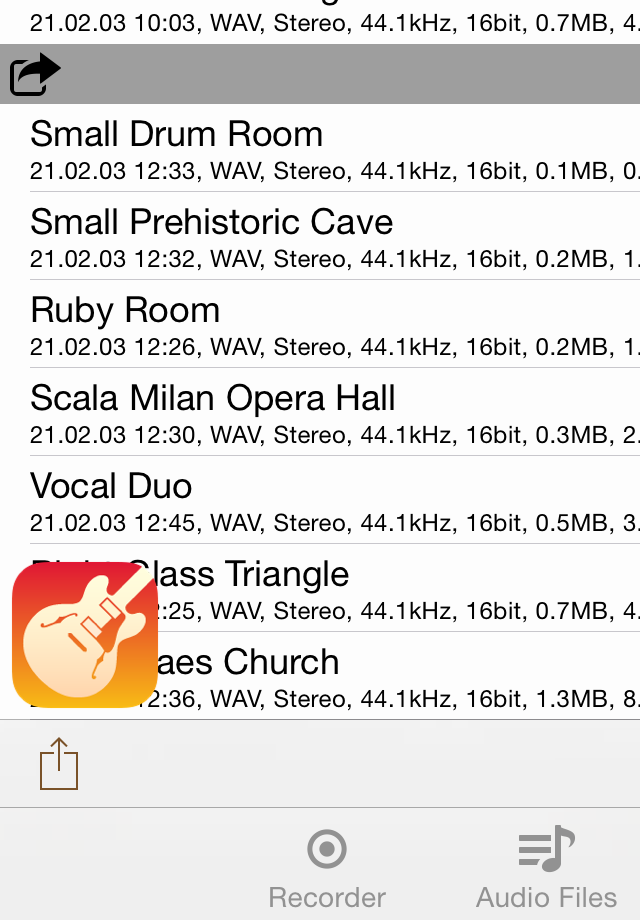
The Files view shows a list of all audio files in the app's documents directory, whether they were created by the app's audio recorder, uploaded by iTunes File Sharing, imported from the media library, or handed to the app by Document Interaction.
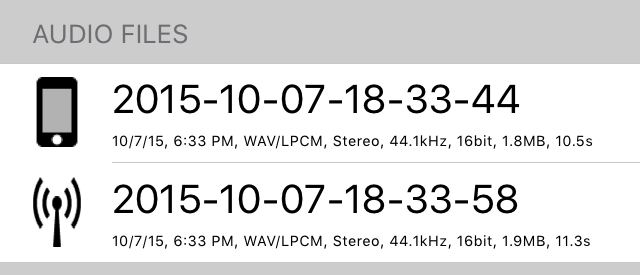
Rooms! 4.6 adds iCloud support to make it easy to share files with your other iOS devices. When you enable iCloud for Rooms! in the device settings, you see an icon to the left of each audio file which indicates if the file is stored locally (device symbol) or in iCloud (wireless network symbol). The action menu that you get by long-tapping a file has an entry for moving the file from the device to iCloud or vice versa.
When you select an audio file, you get play controls at the top of the view. Tap the file again to deselect it (Rooms! 4.10 and later). When an audio file is selected, the slider shows the playing position and can be moved to jump to a different position. You can also long-tap the time display and enter the number of seconds. The slider at the bottom of the view is for volume control. Tapping the speaker images turns the volume off or to maximum, respectively. During playback, the label in the tab bar shows the elapsed time:

If you have activated reverb in the Parameters view,
then when you select a file in the list, reverb will be added when you
play this file. However, when you select a file whose name has the suffix
"+ Reverb", the app will deactivate the reverb.
The behaviour is this way because the suffix "+ Reverb" is
appended by the Copy with reverb function, which shall
be described shortly. However, if you would like to add a second layer of
reverb, you can, after selecting the file, still reactivate the reverb in
the Parameters view.
When you later select a file that does not have this suffix, the app will restore the previous state. I.e. when reverb was / was not active before you selected the file with the suffix, the reverb will / won't be active when you later select a file without the suffix.
Deactivated reverb is indicated by "‐" as the icon of the Parameters view:

You can delete an audio file by swiping its entry. By long-tapping you get an action menu with some or all of the following options:
- Play: Plays the selected file.
- Play as loop: Plays the selected file in an endless loop. This is useful in particular for short files. It gives you time to experiment with reverb parameters.
- Copy to M4A/ALAC: Copies the selected file to an M4A file with Apple Lossless Audio Coding. The size of this file is typically about 50% smaller than that of a 44.1 kHz / 16 bit WAV file, but no quality is lost. This option is not available if the selected file is an MP3 or M4A file.
- Copy to M4A/AAC: Copies the selected file to an M4A file with Advanced Audio Coding. The size of this file can be about 90% smaller than that of an uncompressed WAV file. This option is not available if the selected file is an MP3 or M4A file.
- Copy with reverb, 16 bit: Creates a new 16 bit WAV
file by adding reverb to the selected file. The WAV file's name is
built by adding the suffix
+ Reverbto the name of the selected file. - Copy with reverb, 24 bit: The same, but a 24 bit WAV file is created.
- Copy to impulse responses: Copies the selected file
to the
Userset of the impulse response library. This is possible only for files with length up to 15 seconds. - Duplicate: Create a copy of the file. You have to enter a file name.
- Rename: Allows you to change the name of the selected file.
- E-Mail: Lets you send the selected file as an e-mail attachment. In previous versions this was supported only for files up to 10 MB size. Starting with Rooms! 4.8, it is left to the user and to iOS to decide whether a file can be sent by e-mail or is too large for this. Remember that you can convert a WAV file to an M4A file to get a smaller size.
- Open In...: After tapping this option you can select an app, provided there is another app that has registered to handle the selected file type. Usual candidates are other sound processing apps or sharing apps like Dropbox.
- Move to iCloud: For moving the file from the device to iCloud.
- Move to device: For moving the file from iCloud to the device.
The files view does also serve for managing impulse response archives in
the app's documents directory. An impulse response archive is a zip file
with extension zip or irset, containing impulse
response files. You can use iTunes File Sharing to transfer impulse
response archives. You can also use the Download zip
archive function that you find in the action menu of
the Convolution tab of the Parameters
view. Or you can use Document Interaction, for example by long-tapping
e-mail attachments or tapping a suitable link in a web page. Like audio
files, you can share IR archives with your other iOS devices by iCloud.
When there are impulse response archives, they are displayed in a second section of the table:

Again, you can delete a file by swiping its entry. Long-tapping opens a menu to unpack the archive to the impulse response library, to rename an archive, to e-mail or to open it in another application. Even when you have unpacked an impulse response archive, it is a good habit to preserve the archive in the documents directory. This helps keeping the impulse response library tidy. If you don't need an impulse response set, you can delete it from the library and possibly re-install it later by unpacking the archive once again.
There is an optional third section which shows a list of cancelled recordings. Because it may happen that you cancel a recording by accident, or cancel it by intention but decide later that it was not so bad after all, we thought it would be a good idea to preserve the files in the first instance:

Besides some other entries, the action menu for cancelled recordings offers an entry Restore to move the file to the audio files sections.
There is an action button at the bottom left of the Files view. Up to Rooms! 4.8, this menu offered a long list of actions. Starting with version 4.9, it is just a selector for the type of operation: Sorting, Copying, Deleting and iCloud.
When you select Sorting, you will be presented another menu with the entries Sort by date, Sort by length and Sort by name. The meaning of these options is obvious.
Copying gives you a menu with two entries:
- Import from media library: You can import (not copy-protected) audio files from your media library. After tapping this menu item, you get a standard iOS media picker view where you can select one or several audio items. It is a known and annoying 'feature' of the media picker that there is no deselect and no cancel functionality.
- Copy short files to IR library: This entry is
present only if there are audio files. It lets you copy all 'short'
audio files (you can select the files with a duration of up to 5, 10 or
15 seconds) to the
Userset of the impulse response library. After the copy process is completed, you are asked if you would like to delete the copied files from the documents directory.
Deleting opens a menu with deletion actions:
- Delete short audio files: An additional option to delete short files (again, files with a duration of up to 5, 10 or 15 seconds).
- Delete all audio files: Deletes all audio files from the documents directory, but only after asking the user for confirmation.
- Delete cancelled recordings: Deletes all cancelled recordings, but only after asking the user for confirmation.
Finally, selecting iCloud gives you the option to move all audio files from the device to iCloud or vice versa.
The Parameters view ↑
In this view you can select the reverb type:
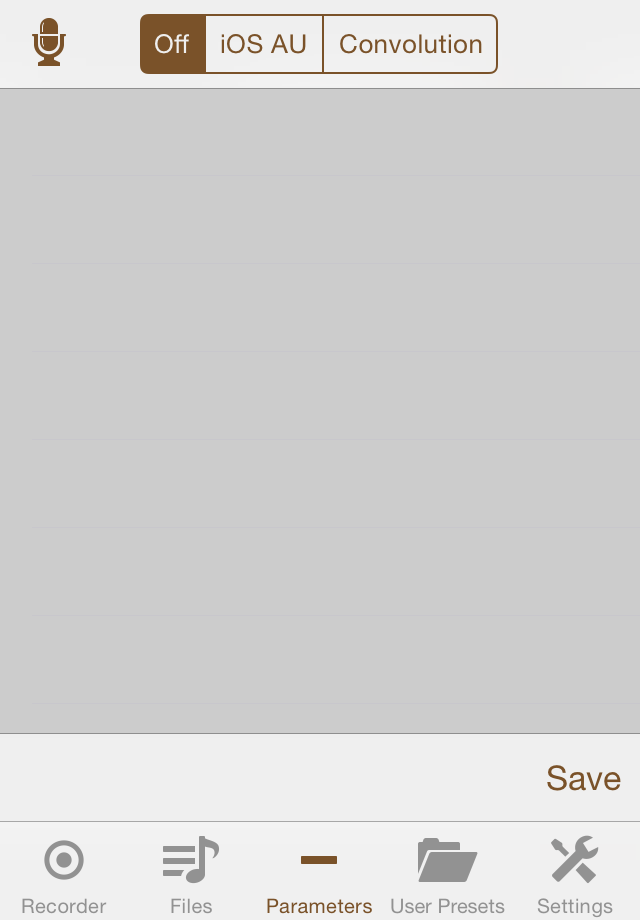
The available settings are:
- Off: No reverb is added, so there are no parameters. With Save you can create a "no reverb" preset, if you wish so.
- iOS AU: The reverb is created by an iOS Audio Unit. There are sliders to control the parameters of the Audio Unit.
- Convolution: The reverb is created by a convolution reverb engine. You can select the impulse response.
In any case there is a microphone button in the top left of the Parameters view. This button activates the playthrough mode, i.e. audio in (microphone or external sound source) is directly routed to audio out, but with added reverb if you select "iOS AU" or "Convolution". While playthrough is active, the microphone gets a red color, and so does the Parameters label in the tab bar:
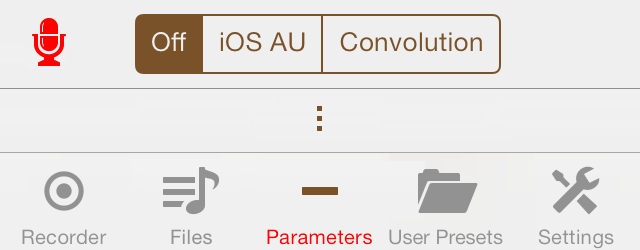
When using microphone input, activate playthrough only with earphones or headphones, because otherwise you create a feedback loop and get ugly high-pitched noise. We are not liable for damage done to your ears or speakers.
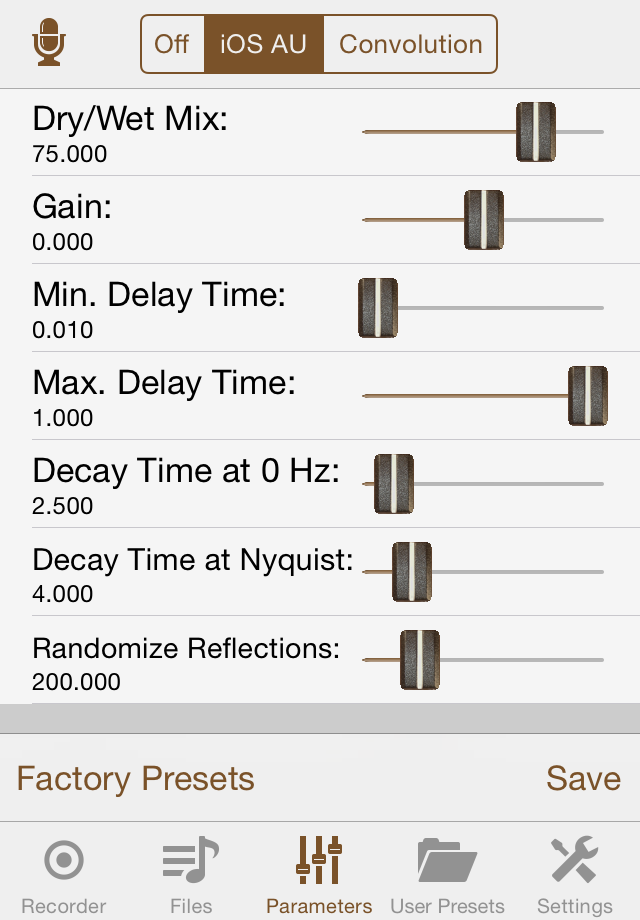
The iOS AU reverb ↑
This is an algorithmic reverb created by an iOS Audio Unit. There are seven sliders to control the reverb:
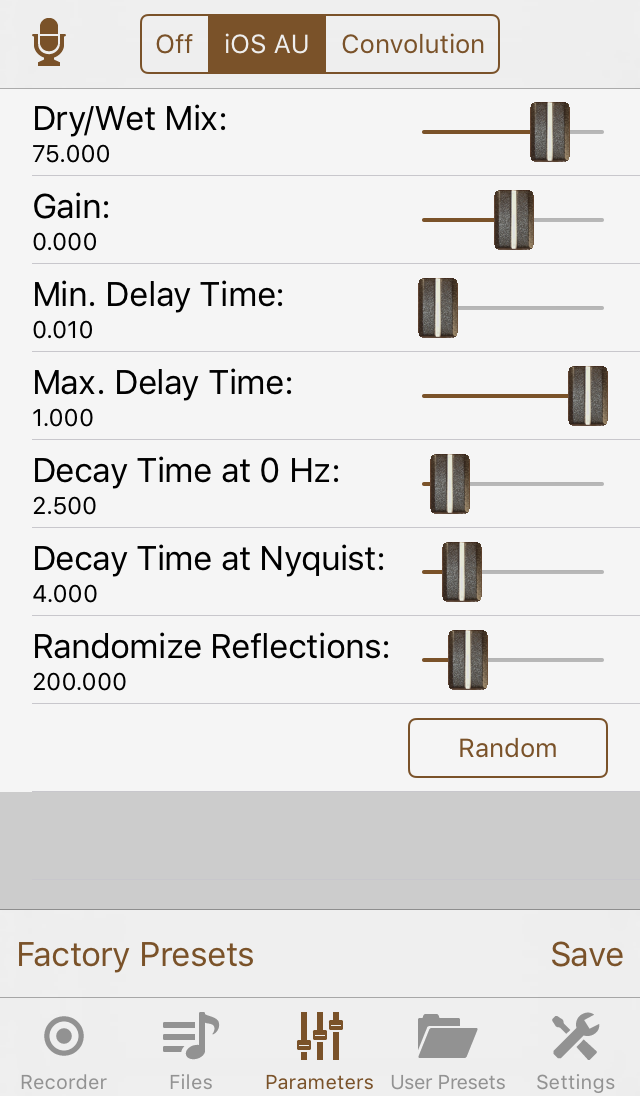
You can operate the sliders while a file is playing in the Audio Files view or while playthrough is active, and the change will take effect immediately. If you would like to enter a specific numeric value, you can do this after long-tapping a parameter name. Rooms! 4.8 adds a Random button. Tapping it gives random values to all parameters.
If you discover a parameter combination that you would like to remember, then you can save it as a user preset by tapping the Save button. When there are iOS AU user presets, the view offers the button User Presets to load the parameters of a user preset. There is also a button Factory Presets to load any one of the five factory presets:

The Convolution reverb ↑
This is real convolution reverb, not just a half-hearted mix of early reflections and algorithmic reverb. You are presented a list of available impulse responses. The free version of Rooms! allows you only to use the included demo impulse responses which you can access after selecting the Create Demo IR set entry of the action menu. To select an impulse response (IR), simply tap its name. The selected IR is marked by a checkmark. If you tap the selected IR again, it gets deselected.

Impulse responses are organised in impulse response sets. The IRs of the free app are subsumed in the IR set "Demo", which can be created by tapping the corresponding entry of the action menu at the left bottom of the view. These are four short IRs of Fokke van Saane (see below) which allow you to test the suitability of your device to act as a cabinet simulator {short IRs, short audio buffer sizes for low latency), and four longer IRs of simple geometric rooms whose purpose is to let you check your device's capability to create reverb (long impulse responses, longer audio buffer sizes). When you purchase the convolution reverb, you can upload and use more interesting IRs.
The IRs of the Demo set are free. You are allowed to use them for any
purpose, without any restrictions. If you would like to use one of these
IRs outside of Rooms!, then copy the IR to the documents directory (there
is a menu entry Copy to Audio Files in the action menu
that you get after long-tapping an IR). In the
Audio Files view, you can export the IR file
by E-Mail or by Open In....
You can also download these files directly from polaron.de:
Small
	  Square.wav
,
Large
	  Triangle.wav
,
Large
	  Square.wav
,
Very
	  Large Octogon.wav
.
Technically, an IR set is just a subdirectory of the subdirectory
ImpulseResponses of the app's Library
directory. The IR set list view shows the names of these subdirectories
and all sound files in the respective subdirectory and its nested
subdirectories. This means you can also use a tool like iFunBox to copy
whole directories of impulse responses from your computer to Rooms! and
to manage your IR sets in a more comfortable way.
The "+" icon at the top right of the view is for creating a new, empty IR set. This and the options Copy to other IR set and Move to other IR set in the IR context menu (which you get after long pressing an IR entry) help when you have many impulse responses and would like to organise them in a certain way. The context menu also allows you to rename an IR or copy it to the documents directory (so it can be seen in the Audio Files view). An IR can be deleted by swiping.
Left to the name of each IR set there is an action button. Its action menu has options to show the description file, the comment file and the license file of the IR set (if these files exist), to rename the IR set, to delete the IR set, and to export it as an archive (see below).
Convolution is a computationally rather expensive mathematical operation. The convolution engine of Rooms! works with FFT (Fast Fourier Transform), is fully parallelised (i.e. it uses all processor cores), and it employs vector operations to achieve the highest possible throughput. Offline reverberation (Create copy with reverb in the Audio Files view) is usable on all devices, but to be able to process juicy impulse responses in realtime (i.e. playing a file while adding reverb, using the playthrough function or using Rooms! as an Audiobus filter or IAA effect) you need the fastest available devices. On an iPad 4, in stereo convolution mode and with a buffer size of 1024 frames, IRs with a duration of up to about 10 seconds are possible in realtime and full quality.
Dropouts of the sound are a no-no. It is better to accept a downgraded reverb quality than to get stuttering sound or dropouts. Within an audio callback, Rooms! calculates only a small initial part of the convolution. This way the reverb does not add latency, but the callback can complete in time. The main part of the calculatiom is done concurrently. If Rooms! is not able to finish this work before the next audio callback, then the convolution operation will be terminated prematurely. This means a loss of reverb quality and is indicated by a yellow warning triangle above the tab bar and tool bar, which is visible in all of the app's views:
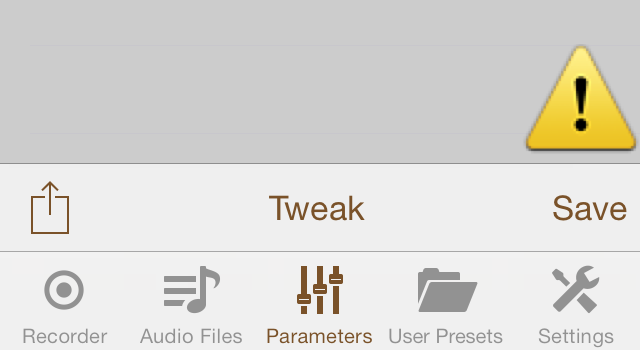
Rooms! measures the time needed to calculate the convolution. When you select Show convolution time in the Settings view you get a milliseconds display below the icon of the Parameters view (if convolution reverb is activated, an IR is selected and there is an audio signal):

Again, there is a Save button in the bottom right of the view, which lets you create a preset from the currently selected IR.
Furthermore there is an action button in the bottom left of the view, which opens an action menu with the following entries:
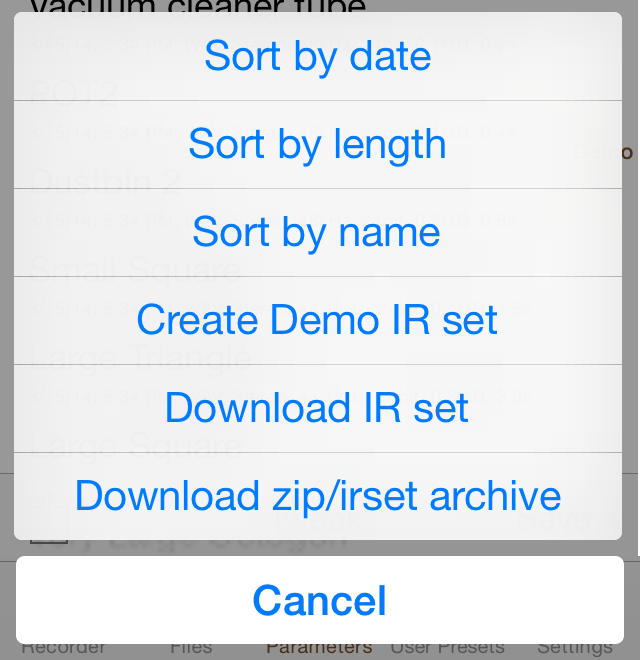
Here you can select whether the IRs within an IR set are sorted by length, by name or by file date. To install the included demo impulse responses set, select Create Demo IR set. This does not need network access, and if you have deleted some or all of the files, you can install them again at any time.
When you have purchased the convolution reverb, you can also download impulse responses from within Rooms!. There are two ways to do this.
One option is to download zip archives. After tapping Download
zip archive, enter or paste an HTTP address of a zip file. The
file name needs to have one of the extensions
zip or irset.
The other, older method is file-by-file download of IR sets by tapping Download IR set. We have prepared IR sets with impulse responses of Fokke van Saane and of Voxengo so you can download and install them with a few taps. We would like to point out that we are not selling these impulse responses. They are available for free at http://fokkie.home.xs4all.nl/IR.htm and http://voxengo.com/impulses/, respectively. We only offer you a convenient way to install the IRs so you don't need to import them manually.
Fokke offers only some of his IRs in WAV format. We used Audacity to convert some of the others. For the case you would like to use the converted IRs with software other than Rooms!, download http://polaron.de/Rooms/van Saane.irset to an empty directory on your PC or Mac, replace the suffix "irset" by "zip" and unzip the file. Like Fokke's files, the converted files are freeware.
The impulse responses of Fokke van Saane are recordings captured with a microphone in real rooms, including funny setups like a vacuum cleaner tube or a bathtub. You can create IRs like this yourself, for example with the audio recorder of Rooms! and a good external mic (use Audacity or another sound editor to postprocess the files). The Voxengo IRs on the other hand were designed with Voxengo's Impulse Modeler software. Creating IRs by software has the advantage that you can model any room geometry, real rooms as well as rooms that exist only in your imagination, and you can simulate arbitrary positions of the sound source and of the listener. Besides that, other than microphone-captured IRs, modelled IRs are free of noise. The Demo IRs were created with the Voxengo Impulse Modeler, too.
When you select Download IR set in the action menu, you
are asked for an HTTP address. The field is pre-filled with the
address polaron.de/ImpulseResponses/. This is the place
where we have prepared the above-named IR sets, and where you can also
download the Demo set if you have deleted it from your device. Before you
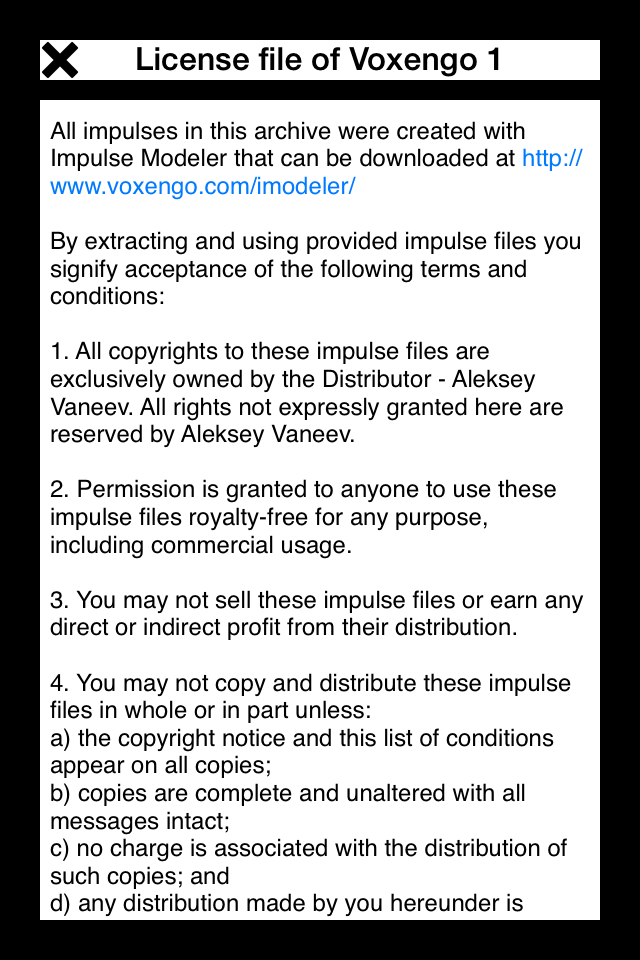
download a set you are offered to view the description file, the comment
file and the license file of the set. When you select a Voxengo set, for
example, the license file looks like this:
When you install many IR sets, the IR table can get quite long. The index at the right side helps to speed up the navigation. Just tap the name of an IR set to scroll to its impulse responses:

The button Tweak can be used only if you have purchased Convolution Reverb. There are following parameters to fiddle around with:
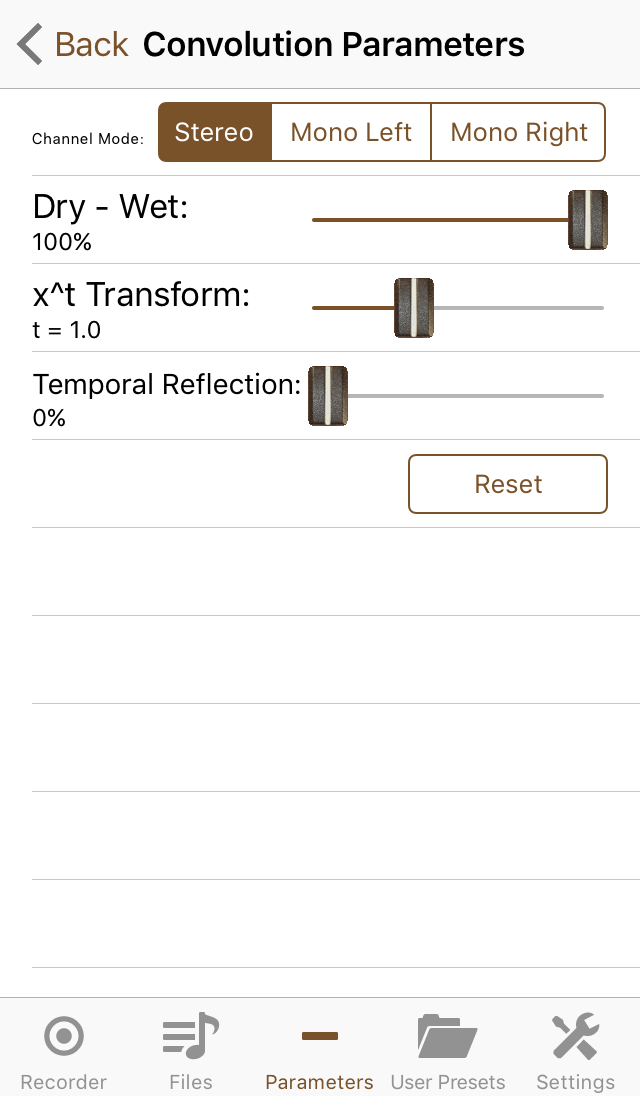
- Channel Mode: Stereo means that the left audio channel is convolved with the left IR channel, and the right audio channel is convolved with the right IR channel. Mono Left convolves only the left audio channel with the left IR channel and outputs the result on both channels. Mono Right works accordingly. The mono modes need less processing time than the stereo mode, of course.
- Dry - Wet: 0% = dry signal and 100% = wet signal.
- x^t Transform: This applies the named transform to the IR values. You can set t in the range [0.5, 2.0]. t = 0.5 corresponds to the square root function and gives an emphasis to small values, hence to the reverb tail. The default t = 1.0 does not change the signal. Larger values dry up the reverb.
- Temporal Reflection: This creates a convex combination of the IR and its reflection in time. 0% = the unchanged IR, 100% = the reflection of the IR.
Reset sets all convolution parameters to their default values, which are Stereo, 100% wet and no manipulation of the impulse response.
The User Presets view ↑
This view is extremely simple. It is just an alphabetical list of the reverb presets that you have saved in the Parameters view. Simply tap an entry to load the preset. Long-tap to rename or delete, or swipe to delete.
The Settings view ↑
In this view you can set some parameters that control the operation of the app:
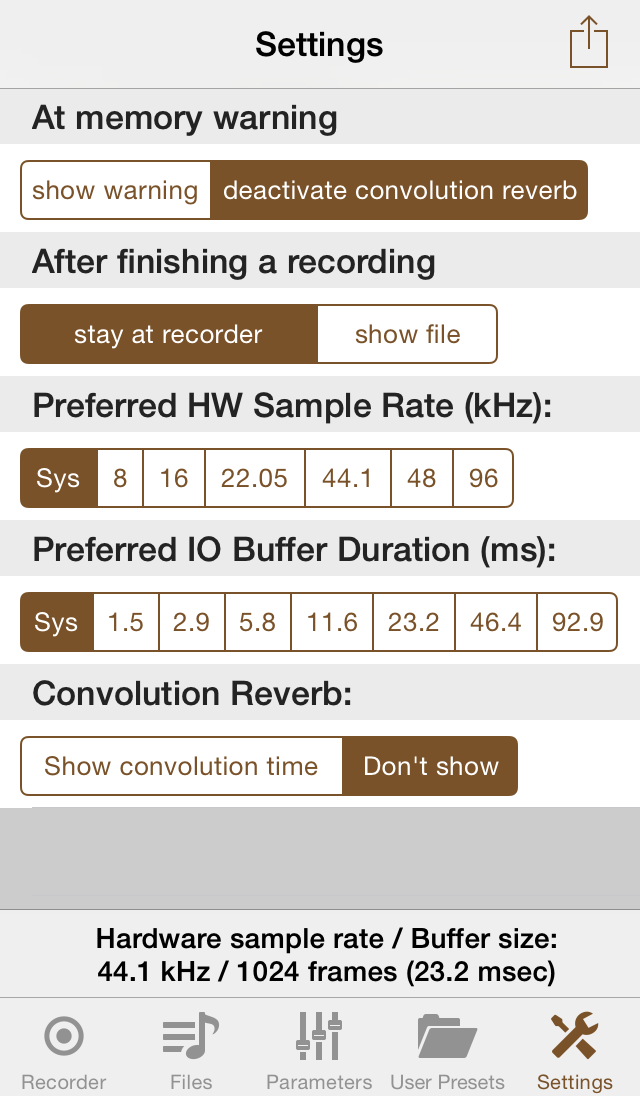
- At memory warning controls the behaviour of the app when it is receiving an iOS notification because of a low memory condition. The safe setting is deactivate convolution reverb. This frees up memory and is supposed to keep iOS happy. If you choose show warning instead, then the app shows a warning, but does not release memory. You may have luck, but just as well iOS may terminate the app.
- After finishing a recording is for configuring the behaviour of the app when you tap the Finish button in the Recorder view.
- Preferred HW Sample Rate (kHz): Here you can set the preferred hardware sample rate. Whether iOS will fulfill your wish depends not only on the capabilities of the hardware but also on the behaviour of other apps that are running. When another app has requested a different sample rate, iOS may deny your request. You can see the actual hardware sample rate at the bottom of the view.
- Preferred IO Buffer Duration (ms): Here you can give iOS a hint about your preferred IO buffer duration. Again, depending on the capabilities of the hardware and the needs of other apps, iOS may or may not respect this preference. You can see the actual IO buffer duration at the bottom of the view.
- Convolution Reverb: Here you can select whether the convolution time in milliseconds should be displayed below the icon of the Parameters view. The time is displayed only if convolution reverb is activated, an impulse response is selected and there is an audio signal.
Keep the value Sys for the preferred hardware sample rate and for the preferred IO buffer duration if you do not want to change the system's current settings. It is also better to keep the Sys values if you would like to use the app with Audiobus or Inter-App audio. For example, if you start Rooms! before Audiobus, set the preferred hardware sample rate to a value different from 44.1 kHz, start a file playback or activate playthrough in Rooms! and then start Audiobus, then Audiobus will fail to connect to Rooms!.
For the preferred IO buffer duration use 1024 or even 2048 or 4096 frames when latency is not an issue. A smaller value reduces the latency but means higher computational demand. The reverb quality will suffer (signalled by the warning flag), or the sound will even drop out, if your device is not fast enough.
At the bottom of the view you see the current hardware sample rate (in Hertz) and buffer size (in frames and in milliseconds). This sample rate and buffer size, usually 44100 Hz and 1024 frames, is used by iOS when it asks the app for audio data, hence for playing audio files and for the playthrough mode. Some apps, like Audiobus or GarageBand, change this to 512 or even 256 frames. Again, low buffer sizes can lead to stuttering sound, even if you don't actually use Rooms! with Audiobus or with GarageBand or other IAA-capable apps.
At the top of the view there is an action button. The action menu offers the options to display a short info about the app, to view the available in-app purchases, and to open the app support page in Safari.
Audiobus support ↑
On iOS 7 and later, Rooms! can be used as an Audiobus filter to add reverb to audio streams. Following the Audiobus philosophy, the user does not need to configure anything inside Rooms! to enable this, but uses the Audiobus app in the well-known way to add Rooms! to an Audiobus processing path. When Rooms! is operating as an Audiobus filter, you cannot use its playthrough function – you will get a warning if you try to. All other functionality of Rooms! is available in this mode.
Rooms! supports the Audiobus state saving. When you create a new preset in the Audiobus app, or update an existing preset, the parameters of the current reverb configuration are saved in Audiobus as they would be saved in a Rooms! user preset. This also allows you to share the parameters of an iOS AU reverb setting with the Audiobus community. It does currently not include the sharing of impulse response files, though.
Be careful to respect the recommended way of starting Audiobus-enabled apps: First start the Audiobus app itself, then start other apps like Rooms!. Otherwise either the Audiobus app or the Audiobus library (and with it Rooms!) may crash.
Inter-App Audio support ↑
Rooms! has basic IAA support and can act as an IAA effect. In this mode, the IAA host's icon is displayed at the bottom left of the screen:
Tap this icon to change to the IAA host app.
IAA operation of Rooms!, at least with GarageBand as host, is currently rather disappointing when you are using convolution reverb. GarageBand insists on small buffer sizes (512 frames on iPad 2/3, and only 256 frames on iPad 4+), which means a high strain even for the most recent devices.
Background operation, access to microphone ↑
Rooms! does normally deactivate its audio session when the app is sent to the background and in consequence gets suspended by iOS. There are however a number of situations where the audio session is kept active:
- When a recording is in progress in the Recorder view.
- When a playback is in progress in the Files view.
- When playthrough is activated in the Parameters view.
- When Rooms! is acting as an Audiobus or IAA effect.
In any of these cases, Rooms! stays running in the background, which is
signalled by a red status bar. This signal cannot be suppressed; it is a
means of iOS to protect your privacy by pointing to the fact that an app
with the audio session
category AVAudioSessionCategoryPlayAndRecord is active in
the background, which could potentially be recording the microphone
input. The signal is given even if the app is not actually in recording
state. The only way to get rid of the red status bar would be to change
the category to AVAudioSessionCategoryPlayback, but
unfortunately an iOS bug prevents this. You can read about this issue
here
and here. Rest
assured that Rooms! does not capture microphone input unless you tap
the Start button in the Recorder view.
On iOS 7 and later, you can use the device's privacy settings to prevent
Rooms! from accessing the microphone (in the Settings app, go to Privacy
– Microphone and deactivate the switch for Rooms!). In this state neither
the audio recorder nor playthrough functionality can be used – you will
get a warning when you tap Start in
the Recorder view or tap the microphone icon in
the Parameters view.
Avoid keeping Rooms! active in the background when you don't need this. This consumes processing power that might be missing for other apps, and of course it is a waste of battery energy.
Impulse response handling ↑
There are various ways to transfer IRs and IR sets to or from your device. One way to transfer IRs is via the documents directory of Rooms!, the contents of which you see in the Files view. Audio files can be transferred to the documents directory by iTunes File sharing or by Document Interaction. They can be exported from the documents directory in the same way. To use Document Interaction, long-tap on a file name and select Open In....
Next, you can copy audio files from the Files view to
the User IR set. You can either copy single files (long tap
the file name and select Copy to impulse responses) or
bulk-copy short files (action menu in the bottom left of the view). There
is also the other way around: You can copy IR files from
the Convolution tab of the Parameters
view to the Files view (long-tap the IR file name).
Handling single files is tedious. IR sets are nothing else than
subdirectories of the subdirectory ImpulseResponses of the
Library directory of Rooms!. So you can use a program like
iFunBox to manage this directory structure manually.
Rooms! also supports importing and exporting IR sets as zip archives. A
zip archive must have the file extension irset
or zip to get accepted by Rooms!, meaning that Rooms! will
be offerred as a handler application whenever you long-tap a irset or zip
file, be it an impulse response archive or not. You can submit
irset or zip files to Rooms! for example via
e-mail attachments, via Dropbox or by clicking a link in a web page. If
you are right now viewing this page with Safari on your iDevice, and
Rooms! is installed on the device, then you can use the links at
the shortcuts section to install the
corresponding IR sets.
Furthermore, Rooms! can create zip archives from its
installed IR sets: Select
Create zip Archive in the action menu of an IR set
X. Then the files of the IR set will be zipped to an archive file named
X.zip in the app's documents directory. Change to
the Files view to process the file further
(e.g. with Open In... to give it to another app).
Even if you see just a flat list of impulse responses, an IR set that was imported from an archive can contain a hierarchy of subdirectories, and non just audio files, but other files as well. Create zip Archive creates an archive of the complete directory tree of an IR set.
Finally, a collection of IR sets can be offered on a web server for
download by the app's Download IR set function (action
menu in the bottom left of the Convolution tab of
the Parameters view). This needs a description file
ImpulseResponseSetList.txt and for each IR set a description
file ImpulseResponseSetDescription.txt. The details are
explained below. The advantage of this method is
that the user can inspect the description file and, if present, the
comment file and the license file, before downloading the IR set.
IR set format for http download ↑
In Rooms! versions before 3.2, http download file-by-file, as described in the following, was the only way to distribute IR sets. In fullfilment of user wishes, Rooms! 3.2 introduced the importing and exporting of IR set archives. As the archive distribution is easier, we are considering to drop support for the old method in a future versions of Rooms!.
As another way to distribute impulse response sets, you can place the
files in a directory on a web server. This directory, for
example http://polaron.de/ImpulseResponses/, has to contain
a text file named ImpulseResponseSetList.txt which lists the
available IR sets. For example the file
http://polaron.de/ImpulseResponses/ImpulseResponseSetList.txt
looks like this:
	  Impulse Response Set:van Saane

	  Impulse Response Set:Voxengo 1

	  Impulse Response Set:Voxengo 2

	  Impulse Response Set:Voxengo 3

	  Impulse Response Set:Voxengo 4
For each IR set there has to be a subdirectory of the same name. For
example http://polaron.de/ImpulseResponses/ has
subdirectories Demo, van Saane, Voxengo
1, Voxengo 2, etc.
Each IR set subdirectory has to contain a text file
named ImpulseResponseSetDescription.txt. To explain the
format we again take an example.
http://polaron.de/ImpulseResponses/Voxengo 1/ImpulseResponseSetDescription.txt
looks like this:
	  Version:1.0

	  Date:2013-12-24

	  Comment:comment.txt

	  License:license.txt

	  Impulse Response:Five Columns Long.wav

	  Impulse Response:Five Columns.wav

	  Impulse Response:French 18th Century Salon.wav

	  Impulse Response:Going Home.wav

	  Impulse Response:In The Silo Revised.wav

	  Impulse Response:Narrow Bumpy Space.wav

	  Impulse Response:Nice Drum Room.wav

	  Impulse Response:Parking Garage.wav

	  Impulse Response:Rays.wav

	  Impulse Response:Trig Room.wav
The version and date information is currently not used by the app, but it can help the user to see if the offered IR set is newer than a version downloaded in the past.
The label Comment: (if present) defines the name of a comment file which gives some general information about the IR set. In the given example, we have created this file when we constructed the IR set from Voxengo's files.
The label License: (if present) defines the name of a license file which states the usage conditions of the IR set. In the given example, this is the original, unaltered license file of Voxengo.
The other entries define the names of the IR files. All listed files have to be within the IR set subdirectory. All text files are supposed to be UTF-8-encoded.
Plans for upcoming releases ↑
- Selecting presets via MIDI.
- The presets view shall get a much more appealing GUI, which also makes better usage of the iPad screen.
- Other GUI improvements.
- Direct playing of files or playlists from the media library, without having to import the files.
- Other effects like chorus, vibrato, etc.
Known deficiencies of the application ↑
Rooms! 1.0 (2013-04-26):
- On iPhone, audio is rendered via the phone speaker instead of the music speaker. Thanks to rafael_ollero for making us aware of this problem. Fixed in version 1.1.
- Sometimes the parameter sliders slip to a wrong position when the device rotates. Rotate again to correct this. Fixed in version 2.0.
- When a file with reverb is created from an audio file that has a sample rate different from 44.1 kHz, then the time slider of the audio files view moves with the wrong speed. This phenomenon can be observed only on iPad. Fixed in version 2.0.
Rooms! 1.1 (2013-05-10):
- If headphones are connected when the app is started, then the sound is still output via the device speaker. To get sound from the headphones you have to unplug and re-plug them. Fixed in version 1.2.
Rooms! 1.2 (2013-05-18):
- No new known problems.
Rooms! 2.0 (2013-05-31):
- No known problems.
Rooms! 2.1 (2013-06-28):
- Saving user presets does not work. In about three months availability of 2.1, no user has complained about this! Are the factory presets good enough for all purposes? Fixed in version 2.2.
Rooms! 2.2 (2013-09-17):
- In the Edit mode of the User Presets view, some operation sequences can lead to a crash. Fixed in version 2.3.
Rooms! 2.3 (2013-09-26):
- No known problems.
Rooms! 3.0 (2014-01-06):
- Convolution reverb: When you select "Create copy with reverb" for a file "A" while a file "B" is playing, then the reverberated file "A + Reverb" contains at the beginning artefacts of the sound of "B" (because there is only one convolution engine, which had still stuff of "B" in its guts). Workaround: Stop the file player before selecting "Create copy with reverb" and wait a moment until the sound has faded out. Turn off playthrough also. Fixed in version 3.1.
Rooms! 3.1 (2014-01-22):
- When long-tapping an iOS AU parameter slider, the numerical input view pops up. This is a rather annoying behaviour. The numerical input ought to appear only when the user long-taps the parameter name. Thanks to Patrick Stiegeler for pointing out this problem. Fixed in version 3.2.
- Some short WAV files with 8kHz/8bit/mono do not work as impulse responses.
Rooms! 3.2 (2014-02-17):
- Irset archives cannot be imported if there are nested subdirectories with identically named files. Fixed in version 3.3.
Rooms! 3.3 (2014-03-06):
- No new known problems.
Rooms! 3.4 (2014-03-28):
- The IAA initialisation does not work ("AudioOutputUnitPublish Failed" at app startup on iOS 7) because of a missing IAA entitlement. Fixed in version 3.41.
Rooms! 3.41 (2014-04-02):
- Under certain conditions, Rooms! fails to initialise the audio graph at startup. It seems this happens when another app is running or was running that sets the hardware sample rate to a value different from 44100 Hz. On iOS 5/6 terminate the other app and Rooms! and, after waiting a few seconds, start Rooms! again. Fixed in version 3.50.
Rooms! 3.50 (2014-08-20):
- With convolution reverb, the new preferred buffer size setting of 4096 frames does not work with hardware sample rates of 22050 Hz (corresponding to a buffer duration of 185.8 ms) and less because in these cases iOS switches to buffer sizes that are not a power of 2, and the convolution engine cannot cope with this. The same is true for a preferred buffer size of 2048 frames and a hardware sample rate of 8000 Hz.
Rooms! 4.0 (2014-08-28):
- Handing over audio files to Rooms! via Open In... does on iOS 8 not work with files shorter than 15 seconds. The action selector which lets the user decide between "Audio File" and "Impulse Response" does not appear. Fixed in version 4.1.
- Rooms! 4.0 uses symbolic links for files of the Demo IR set. iOS 8 is changing directory names whenever you install a new version of an app, which breaks the symbolic links. Workaround: You have to delete and reinstall the Demo IR set. Fixed in version 4.1, which creates copies of the files instead of symbolic links.
Rooms! 4.1 (2014-09-27):
- No new known problems.
Rooms! 4.2 (2014-11-25):
- Under certain cirumstances (other app changing the hardware sample
rate while Rooms! is in suspended state), the playback speed of audio
files is wrong. Workaround: Go to the Settings view,
select a different sample rate and return to the previous
value.
Fixed in version 4.3. - It is not possible to download zipped IR archives which are offered
by a web server via a URL
like
http://.../download.php?.... Fixed in version 4.3.
Rooms! 4.3 (2015-02-20):
- The playback speed problem is still there. Workaround: See above. Fixed in version 4.4.
- A wrong audio file duration is displayed after a file was imported from the media library. Fixed in version 4.4.
Rooms! 4.4 (2015-02-27):
Rooms! 4.5 (2015-03-23):
Rooms! 4.6 (2015-07-30):
- No new known problems.
Rooms! 4.7 (2015-09-12):
- Sorting audio files does not work. Fixed in version 4.8.
Rooms! 4.8 (2015-10-14):
Rooms! 4.9 (2016-03-14):
- When you delete an audio file while it is playing and put the app to the background, then an error message appears when the app if fetched to the foreground again. This problem was there in (probably) all earlier versions as well. Fixed in version 4.10.
Rooms! 4.10 (2016-04-18):
- No new known problems.