| Return to the Thafknar Support Page | Return to the Thafknar User Manual |
The Recorder view
This view has a single button, named Start, which serves for starting a recording, and buttons to select the file format, the sample rate, the bit depth and the channel mode for the recording:
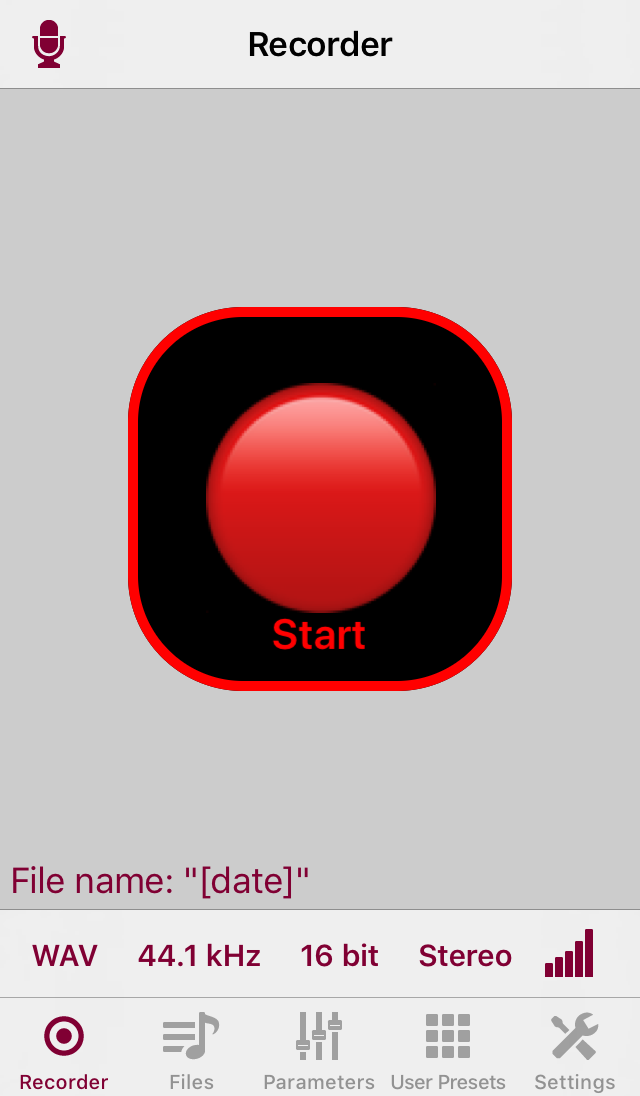
The recorder supports the creation of compressed AAC (Advanced Audio Coding) and uncompressed WAV files.
The supported sample rates are 8, 16, 22.05, 44.1, 48 and 96 kHz. However, this does not mean that the audio will be captured in the requested quality, in particular if you are using the device's internal microphone. Furthermore, the capture sample rate will probably be not higher than the current hardware sample rate of the device, which you can see at the bottom of the Settings view. If you select 48 kHz or 96 kHz, but the hardware sample rate is 44.1 kHz, then the audio data of the file will just be upsampled from 44.1 kHz or whatever the microphone or sound source deliver. Whenever the recording sample rate and the current hardware sample rate differ, the app displays a warning at the top of the Recorder view, because this means an additional resampling process that can reduce the quality of the sound data.
The bit depths are 8, 16 and 24 bit for integer and 32 bit for floating point uncompressed WAV files. For AAC, this setting has no meaning.
The channel mode is Mono or Stereo. Again, selecting Stereo does not give a true stereo file if your microphone or sound source delivers a mono signal. You will just get a file with two identical channels. Only if you connect a stereo microphone or stereo sound source, you will get a real stereo file.
AAC offers good sound quality and requires significantly less SSD space than uncompressed WAV. The setting 44100 Hz / 16 bit gives a frequency range and dynamics that comfortably exceed what your ears can perceive and hence is fine for recording music. A lower sample rate means that you loose high frequencies. With a lower bit resolution you can still record the same frequency range, but it gives a lower signal / noise ratio. For voice messages, 8000 Hz / 8 bit / Mono are good enough and result in smaller files. Use WAV format and 44100 or 48000 Hz and 24 or 32 bit for recording sound that you intend to postprocess or use as an impulse response (see later).
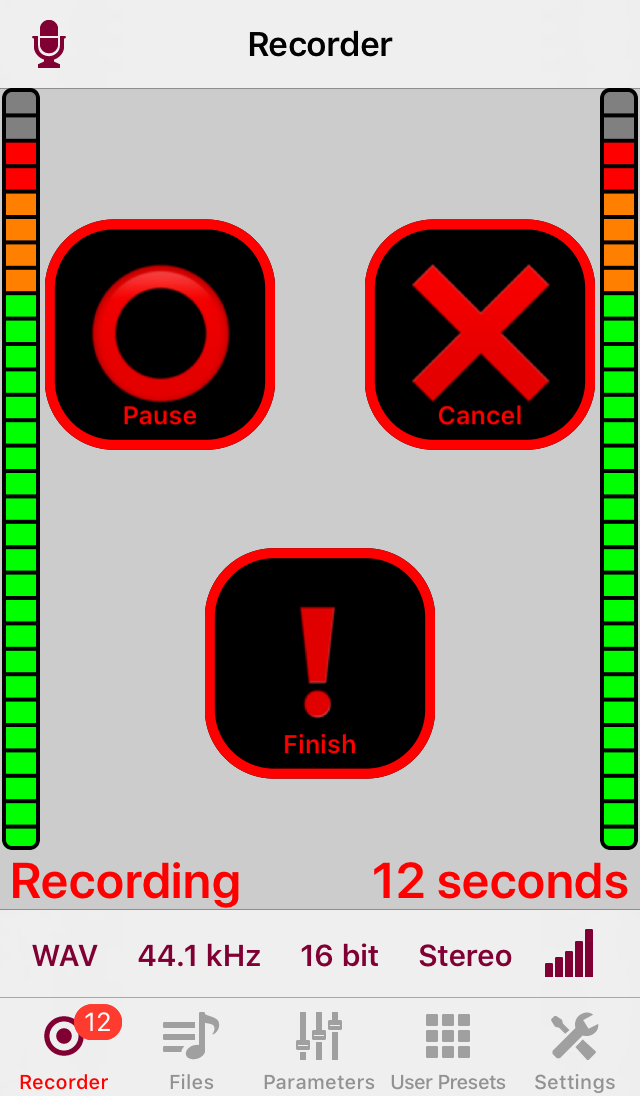
You have to set the parameters before you start the recording. As soon as you tap the Start button, the recording begins and the view displays the buttons Pause, Cancel and Finish. You can, in the Settings view, set the recorder to a single-button mode where there is only one button which alternates between Start and Finish. This is useful for operating the recorder without looking at the screen, in particular when you use it with the audible recorder confirmations which, too, can be configured in the Settings view.
Starting with Thafknar 7.1, you can long-press the Start button to specify a fixed recording duration and to initiate a recording after a delay. Version 7.2 adds the option to specify a starting time instead of delay. Version 7.6 adds support for the "Magic Tap": Double-tapping with two fingers when VoiceOver is running starts or stops a recording. This works in all of Thafknar's views, and confirmation sounds are played regardsless of whether the corresponding option in the Settings view is selected.
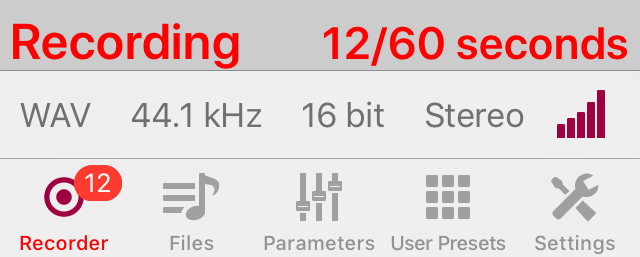
While the recording is performed, you can observe the number of elapsed seconds, which is also displayed at the icon of the Recorder view. By tapping the bar graph icon, you can activate a two-channel peak meter. The channels are displayed at the left and the right side of the view:
Starting with version 7.11, the number of elapsed seconds is also shown as an app badge if you set the corresponding option in Thafknar's settings.
If the recording process was initiated with a fixed duration, then this duration is shown after the seconds counter. The recording finishes automatically when this duration is reached, but you can at any time finish or cancel the recording process prematurely.
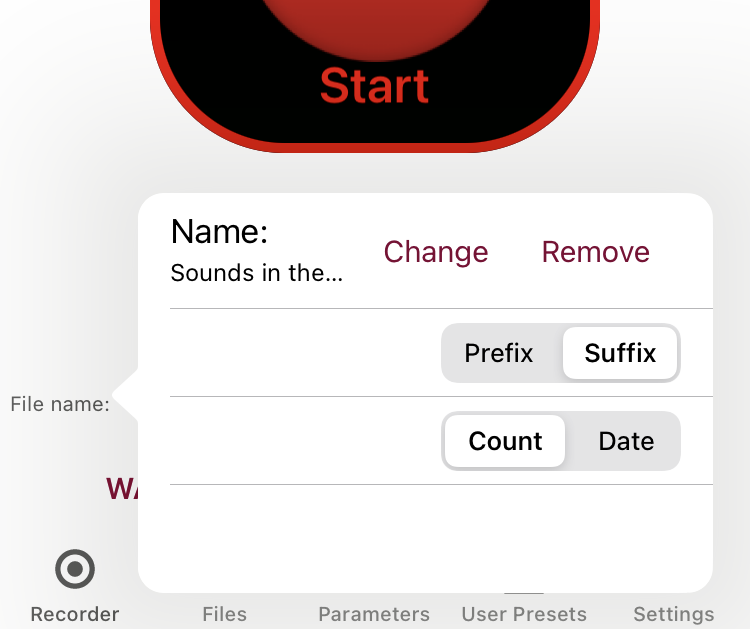
The usage of the buttons Pause, Cancel and Finish is obvious. Only after you press the Finish button, the recording will be saved and can be seen in the Files view. For the recording's name, you can enter a base name and let it be prefixed or suffixed either with the date or with a counter. The file name pattern is displayed at the lower left of the Recorder view and can be changed after tapping at the text. Of course you can later change the name in the Files view.
In the Settings view you can set whether recordings should be saved to the device, i.e. to the app's local documents directory, or to iCloud. This function is new in Thafknar 8.3.
The behaviour when a recording is finished can be configured, too, in the Settings view. You can advise the app to either stay at the Recorder view or automatically switch to the Files view and select the recording file. The latter works only when you save recordings to the device.
The behaviour when you cancel a recording can be configured as well in the Settings view. You can choose that cancelled recordings will be deleted or be saved. In the latter case, you can see the files in the section Cancelled Recordings of the Files view. You can later decide if you would like to restore or really would like to delete a cancelled recording.
Furthermore, a recording in progress is not neccessarily lost in case of a system crash. At the next start of Thafknar, the app will see the unfinished recording file and ask if you would like to recover it. Note however that this file will be incomplete and structurally broken. You need an external audio file tool to repair it.
To ensure you don't loose any data in case of an incoming phone call, in this situation the recording is being finished and saved.