| Return to the Thafknar Support Page | Return to the Thafknar User Manual |
The Presets View
Actually, there are two presets views, a list view and a grid view. You can toggle between these two views by tapping at the User Presets toolbar icon.
As the presets are stored in files, they can be moved to iCloud. Attention: For Sounding Presets, and for presets that refer to images (as decorations of preset buttons in the User Presets grid view), you also need to move the corresponding audio and image files to iCloud if you would like to use these presets on another device.
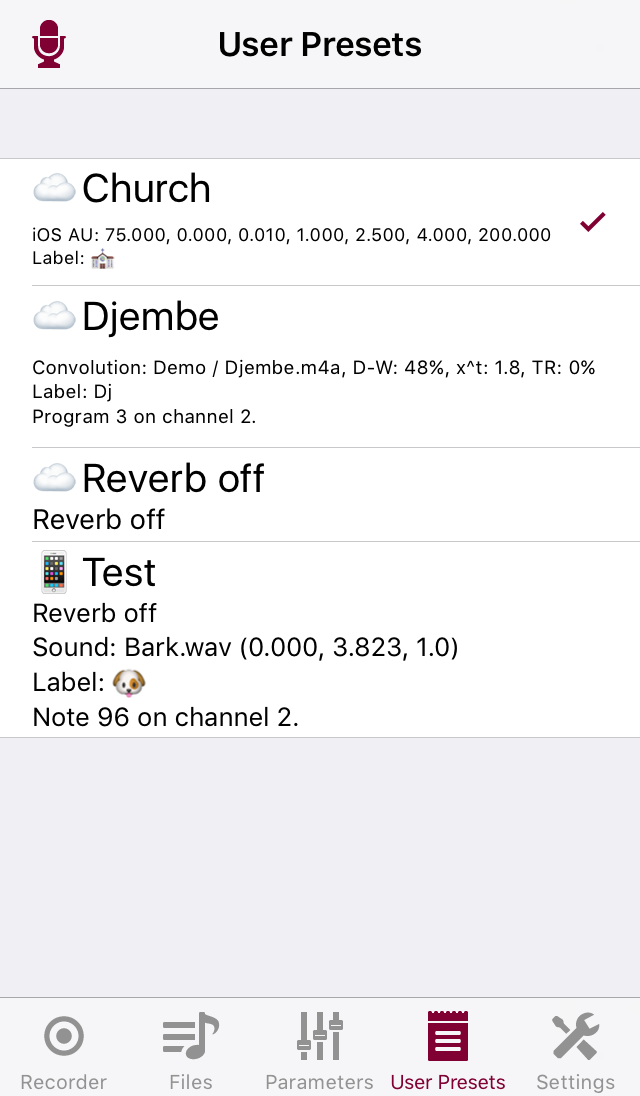
The User Presets list view
This view is extremely simple. It is just an alphabetical list of the reverb presets that you have saved by tapping Save in the Parameters view or by selecting Create Sounding Preset for an audio file in the Files view. Long-tap to get an action menu with the following options:
- Set reverb: This copies the current reverb parameters to the selected preset. When you have created a Sounding Preset in the Files view, then this is the way to add reverb to it. When the current reverb setting is "Off", then the reverb will be deactivated before the corresponding Sounding Preset is played.
- Remove reverb: Removes the reverb setting from the selected preset. This makes sense only for a Sounding Preset. A Sounding Preset without a reverb setting does not change the current reverb and is played with whatever the current settings are.
- Set sound: Select a sound file to make the selected preset a Sounding Preset.
- Edit playback parameters: This option for Sounding Presets is new in Thafknar 5.1. It opens a view where you can set the start time, the end time, and the volume of the Sounding Preset. Setting the start time allows to skip leading noise. The values can be set using sliders or, after tapping the label of a parameter, numerically.
- Remove sound: If the selected preset is a Sounding Preset, then this removes the relation to the audio file. This does not delete the audio file, nor does it affect the reverb settings or the MIDI control settings of the preset.
- Set label: With this you can set a label that will be used for preset buttons referring to the selected preset (see User Presets grid view).
- Remove label: If a label was set for the selected preset, then you can remove it with this option.
-
Set image: With this you can set an image that will be
used for preset buttons referring to the selected preset
(see User Presets grid view). Starting with Thafknar
5.2, this option lets you select the following image sources:
- file: This is for selecting an image file, like in earlier versions. (Provided you have uploaded image files to the app.)
- camera: This is for using the camera to take a photo to set it as an image for preset buttons. You need to give permission to the app to access the camera. The image will be scaled to a resolution of 1024×1024 and saved to the documents directory, with the current date and time as file name. You can change the file name in the Files view. It does not matter whether you take the image in portrait or landscape mode, as only the central square of the image will be used.
- photo library and saved photos: These are for importing an existing photo for using it as an image for preset buttons. You need to give permission to the app to access the photo library. Concerning the resolution, the file name and the used section of the photo, see the camera option.
- Remove image: If an image was set for the selectec preset, then you can remove it with this option.
- MIDI Learn: This is for configuring MIDI control for the selected preset, provided you have enabled MIDI in the Settings view.
- MIDI Remove: Removes MIDI control for the selected preset.
- Duplicate, Rename: These are the usual file operations.
- E-Mail: You can send the preset to another user, but don't forget that for a Sounding Preset or a preset with a button image you also need to send the audio file and the image file.
- Open In...: This allows you to handle the preset files with the Files app if you wish to do this for whatever reason.
Furthermore, there are the usual iCloud options, and you can swipe to the left to delete the preset. Simply tap an entry to load the preset. For a Sounding Preset, this starts a playback of the corresponding audio file. If the Sounding Preset includes reverb parameters, then beforehand these reverb parameters are installed, but only if no other Sounding Preset is already playing. While Sounding Presets are playing, the top left of the view shows a stop sign. As you might have expected, you can finish the playback by tapping this button.
Presets whose reverb settings coincide with the currently activ settings are indicated with a checkmark. The detail text of each preset shows information about the reverb parameters (if the preset contains reverb settings), the linkage to an audio file (if the preset is a Sounding Preset), the label and image for preset buttons (if these are set), and the MIDI control configuration of the preset (if MIDI is activated in the Settings view and the preset has MIDI control information:
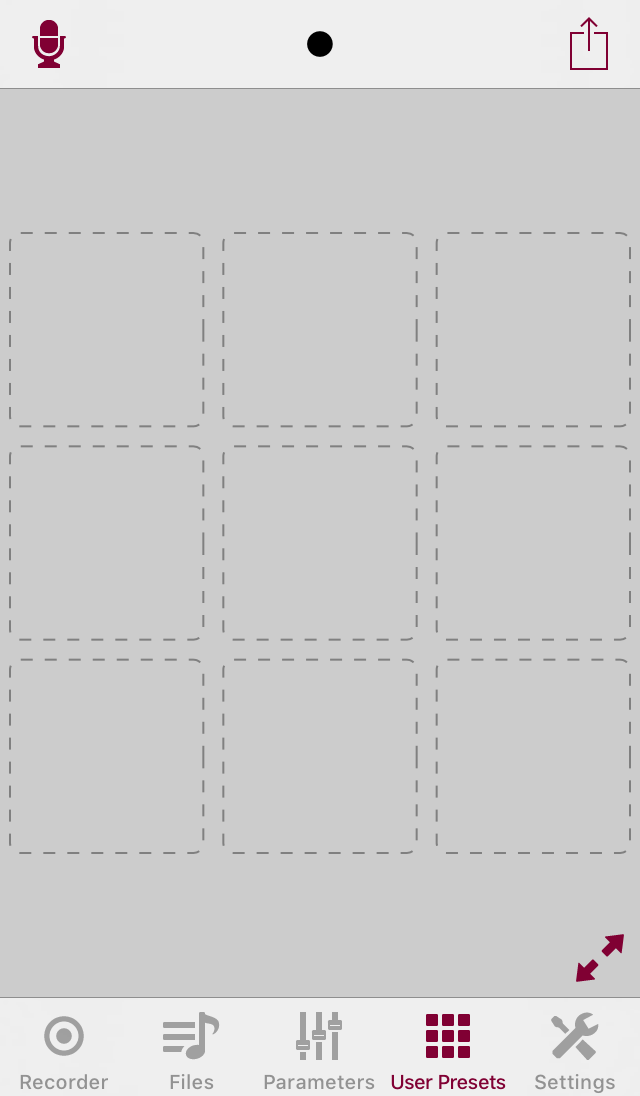
The User Presets grid view
To use the functionality of this view, you need to perform the in-app purchase "Preset Buttons".
The User Presets grid view can hold any number of pages, where each page is built of a 3×3 grid. The user can place preset buttons at the positions of these grids. Browse through the pages by swiping horizontally. The view title gives some orientation about the current page. For example, the title ○○●○ means that there are four pages, the third page being current. The action menu at the top right of the view offers the possibility to add more pages and to remove the current page.
The following must be understood: In this view you do not create presets, but you create buttons for existing presets. More than one button can be created for the same preset, on the same or on different pages. Removing a button does not delete the preset. However, the button data is stored in the preset. Consequently you cannot create two buttons with different labels or images for one preset. Instead, you need to create two presets, each with its own label or image, and then use one preset for one button and the other for the other button.
If you work with several devices and create a button on device 1 with preset A and a button on device 2 with preset B, both at the same position, and then synchronise preset A and B via iCloud, then you get a situation where two buttons are placed at the same position. It is undefined which button will be displayed in this case, so better avoid to do this.
At the beginning, there are no buttons defined. Grid positions with undefined buttons have a dashed border:
Tapping or long-tapping an empty grid position gives you an action menu for adding a button at this position by selecting a preset. Tapping a button loads its preset, long-tapping a button lets you remove this button.
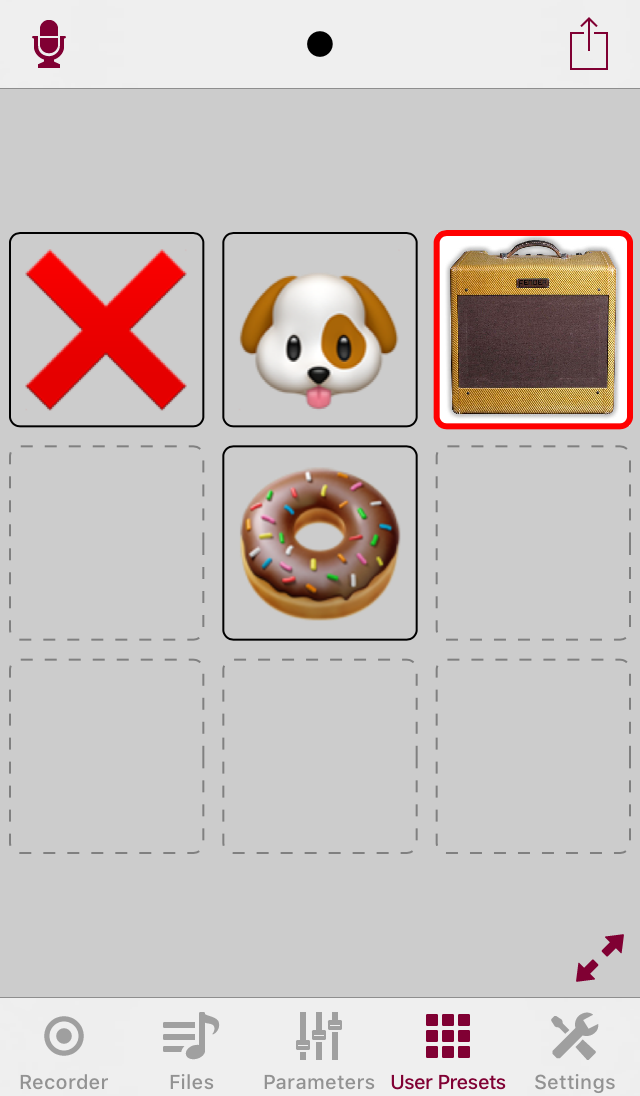
The look of a button depends on its preset's properties:
- If you have set an image for the preset in the User Presets list view, and if the image file can be loaded, then the button is decorated with this image.
- Otherwise, if you have set a label for the preset in the User Presets list view, then the button is decorated with this label. Use single Emoji characters or symbols to get nice labels. (Except if you are on iOS 5 or iOS 6, as Emojis and symbols do not scale on these iOS versions.)
- Otherwise the button is decorated with the preset name.
Buttons with presets whose reverb parameters match the currently active reverb are displayed with a red border.
For Sounding Presets, the behaviour is as described in the User Presets list view: Reverb parameters get established only when no other Sounding Preset is playing, and while Sounding Presets are playing, there is a stop button in the right top of the view that lets you finish the playback at any time.
Starting with Thafknar 5.1, there is an expansion button in the bottom right of the view. This is for changing to full screen mode which shows only the preset buttons and a contraction button for returning to the normal view. There is no edit functionality in the full screen mode and no pages display at the top, but you can still swipe horizontally to change pages. The full screen mode is not allowed during recording.